
In this tutorial we will walk through how to deploy simple docker containers into AWS ECS. ECS is a container service to deploy and manage your Docker containers on AWS. Basically, there are two types to deploy containers on ECS clusters which are;
- EC2 instances
- Fargate (Serverless)
We will use EC2 type container instances. Before starting there are some components specific to ECS terminology which we need to understand;
- Task Definition: JSON|YML based configuration file. In other words recipe or blueprint of your containers. We give parameters like Docker Image, CPU, Memory, Network Mode for one or more containers. You can think of it like a Dockerfile.
- Task: An instance based on given Task Definition. This is the Docker container which can contain one or more Task Definitions.
- Service: Allows you to create and maintain a number of tasks (containers) including their lifecycle and deployment properties from same Task Definition.
- ECS Container Agent: A service (docker container) that manages the connection between ECS cluster.
- Cluster: Group for defining container instances. It can be either group of EC2 instances or a Fargate type cluster which is serverless.
Here is the high level architecture for our application

There are 3 different AWS components we will create and configure;
- Elastic Container Service (ECS)
- Elastic Load Balancer (ELB)
- Elastic Container Registry (ECR)
We will create and configure ECS and ELB components, however, I will use ECR to get my own simple docker image. Moreover, here is the high level representation of EC2 instances in ECS cluster.

Creating ECS Cluster
We will create an empty ECS cluster with EC2 type container instance. We have to keep in mind that we should use same subnets for ELB as well, otherwise, the Target Group for ELB won’t be healthy and they won’t be reachable via ELB. For sake of simplicity I used my default VPC and subnets so that we won’t create them in this tutorial. First we will create a security group to use it for ECS cluster;
aws ec2 create-security-group –group-name example-ecs-sg –description example-ecs-sg
1
2
3
{
    "GroupId": "sg-087f0cf793164eed3"
}
Later on, we will allow inbound traffic from another security group we will create for Elastic Load Balancer. On the other hand, allowing ssh connections into this cluster is optional. I am allowing now to show docker containers running in EC2 instances at the end of this tutorial.
aws ec2 authorize-security-group-ingress –group-name example-ecs-sg –protocol tcp –port 22 –cidr 0.0.0.0/0
Here is the ecs-cli command for creating ECS cluster. Hence the fact that --keypair parameter is optional and I just added to make EC2 instances accessible by ssh.
ecs-cli up –cluster example-ecs-cluster –instance-role ecsInstanceRole –keypair dev.pem –size 1 –security-group sg-087f0cf793164eed3 –subnets subnet-dafc6f93,subnet-6b8f2b30,subnet-eed8a38b,subnet-f38b2bde –vpc vpc-340b1053 –instance-type t2.small –launch-type EC2
A successfull output will look like;
1
2
3
4
5
6
7
INFO[0001] Using recommended Amazon Linux 2 AMI with ECS Agent 1.32.1 and Docker version 18.06.1-ce
INFO[0002] Created cluster                               cluster=example-ecs-cluster region=us-east-1
INFO[0004] Waiting for your cluster resources to be created...
INFO[0004] Cloudformation stack status                   stackStatus=CREATE_IN_PROGRESS
INFO[0066] Cloudformation stack status                   stackStatus=CREATE_IN_PROGRESS
INFO[0128] Cloudformation stack status                   stackStatus=CREATE_IN_PROGRESS
Cluster creation succeeded.
We can also verify the cluster from AWS Console

Creating Task Definition
We want to make ECS cluster to provision and manage our own Docker images into the container instances. I will use an already existing hello world nodejs image from my ECR. Here are Dockerfile and server.js script from my node application looks like;
1
2
3
4
5
6
7
8
9
10
11
12
13
14
15
16
17
18
19
const express = require('express');
const app = express();
const port = 8080;

app.get('/', (req, res) => {
  console.log('New request received');
  res.send({'data': 'Health Check Succesfull'});
});

app.get('/hello-world', (req, res) => {
  console.log('New request received');
  res.send({'data': 'Hello World'});
});

var server = app.listen(port, () => console.log(`Example app listening on port ${port}!`));

module.exports = {
  server: server,
};
1
2
3
4
5
6
7
8
9
10
11
12
13
14
15
16
17
18
19
FROM buraktas/node-hello-world

# Create app directory
WORKDIR /usr/src/app

# Install app dependencies
# A wildcard is used to ensure both package.json AND package-lock.json are copied
# where available (npm@5+)
COPY package*.json ./

RUN npm install
# If you are building your code for production
# RUN npm ci --only=production

# Bundle app source
COPY . .

EXPOSE 8080
CMD [ "node", "server.js" ]
For the task definition we will expose port 8080 and use the image url from our ECR repository which has our Docker image.
aws ecs register-task-definition –cli-input-json file://task-definition.json
task-definition.json looks like;
1
2
3
4
5
6
7
8
9
10
11
12
13
14
15
16
17
18
19
20
{
    "containerDefinitions": [
      {
        "name": "node-app",
        "image": "548754742764.dkr.ecr.us-east-1.amazonaws.com/node-app",
        "memory": 512,
        "cpu": 128,
        "essential": true,
        "portMappings": [
          {
             "containerPort": 8080,
             "hostPort": 8080,
             "protocol": "tcp"
          }
        ]
      }
    ],
    "family": "nodejs-task-def",
    "taskRoleArn": "arn:aws:iam::548754742764:role/ecsTaskExecutionRole"
}
We will have a an output like;
1
2
3
4
5
6
7
8
9
10
11
12
13
14
15
16
17
18
19
20
21
22
23
24
25
26
27
28
29
30
31
32
33
34
35
36
37
38
39
40
41
{
    "taskDefinition": {
        "taskDefinitionArn": "arn:aws:ecs:us-east-1:548754742764:task-definition/nodejs-task-def:2",
        "containerDefinitions": [
            {
                "name": "node-app",
                "image": "548754742764.dkr.ecr.us-east-1.amazonaws.com/node-app",
                "cpu": 128,
                "memory": 512,
                "portMappings": [
                    {
                        "containerPort": 8080,
                        "hostPort": 8080,
                        "protocol": "tcp"
                    }
                ],
                "essential": true,
                "environment": [],
                "mountPoints": [],
                "volumesFrom": []
            }
        ],
        "family": "nodejs-task-def",
        "taskRoleArn": "arn:aws:iam::548754742764:role/ecsTaskExecutionRole",
        "revision": 2,
        "volumes": [],
        "status": "ACTIVE",
        "requiresAttributes": [
            {
                "name": "com.amazonaws.ecs.capability.ecr-auth"
            },
            {
                "name": "com.amazonaws.ecs.capability.task-iam-role"
            }
        ],
        "placementConstraints": [],
        "compatibilities": [
            "EC2"
        ]
    }
}
We can see the task definition we created from AWS Console

Creating Elastic Load Balancer (ELB) with Target Group
We will create a Target Group which will be used by Elastic Load Balancer. Here is the order of steps we will follow to create an ELB;
- Create a Security Group for ELB and allow ingress traffic from public network.
- Create a Target Group to register it to the Elastic Load Balancer we will create.
- Create an Elastic Load Balancer with the security group and target group we created.
Lets create another security group with name example-elb-sg for our ELB.
aws ec2 create-security-group –group-name example-elb-sg –description example-elb-sg
1
2
3
{
    "GroupId": "sg-0620dc50979b05b24"
}
Now instead of enabling SSH access we will enable inbound network traffic only from port 80 for security group example-elb-sg
aws ec2 authorize-security-group-ingress –group-name example-elb-sg –protocol tcp –port 80 –cidr 0.0.0.0/0
Now we have to allow example-ecs-sg security group to accept ingress traffic from example-elb-sg security group
aws ec2 authorize-security-group-ingress –group-name example-ecs-sg –source-group example-elb-sg –protocol tcp –port 1-65535
Here is the command for creating Target Group with its output.
aws elbv2 create-target-group –name example-target-group –port 80 –protocol HTTP –target-type instance –vpc-id vpc-340b1053 –health-check-protocol HTTP –health-check-path /hello-world
1
2
3
4
5
6
7
8
9
10
11
12
13
14
15
16
17
18
19
20
21
22
23
{
    "TargetGroups": [
        {
            "TargetGroupArn": "arn:aws:elasticloadbalancing:us-east-1:548754742764:targetgroup/example-target-group/73e3f1b663022983",
            "TargetGroupName": "example-target-group",
            "Protocol": "HTTP",
            "Port": 80,
            "VpcId": "vpc-340b1053",
            "HealthCheckProtocol": "HTTP",
            "HealthCheckPort": "traffic-port",
            "HealthCheckEnabled": true,
            "HealthCheckIntervalSeconds": 30,
            "HealthCheckTimeoutSeconds": 5,
            "HealthyThresholdCount": 5,
            "UnhealthyThresholdCount": 2,
            "HealthCheckPath": "/hello-world",
            "Matcher": {
                "HttpCode": "200"
            },
            "TargetType": "instance"
        }
    ]
}
Now we will create an Elastic Load Balancer.
aws elbv2 create-load-balancer –name example-elb –subnets subnet-dafc6f93 subnet-6b8f2b30 subnet-eed8a38b subnet-f38b2bde –security-groups sg-0620dc50979b05b24 –scheme internet-facing –type application
1
2
3
4
5
6
7
8
9
10
11
12
13
14
15
16
17
18
19
20
21
22
23
24
25
26
27
28
29
30
31
32
33
34
35
36
37
38
39
40
41
42
43
44
45
46
47
48
49
50
51
{
    "LoadBalancers": [
        {
            "LoadBalancerArn": "arn:aws:elasticloadbalancing:us-east-1:548754742764:loadbalancer/app/example-elb/3cb7c0ce850338d6",
            "DNSName": "example-elb-301999857.us-east-1.elb.amazonaws.com",
            "CanonicalHostedZoneId": "Z35SXDOTRQ7X7K",
            "CreatedTime": "2019-11-11T13:05:54.480Z",
            "LoadBalancerName": "example-elb",
            "Scheme": "internet-facing",
            "VpcId": "vpc-340b1053",
            "State": {
                "Code": "provisioning"
            },
            "Type": "application",
            "AvailabilityZones": [
                {
                    "ZoneName": "us-east-1b",
                    "SubnetId": "subnet-6b8f2b30",
                    "LoadBalancerAddresses": [
                        {}
                    ]
                },
                {
                    "ZoneName": "us-east-1a",
                    "SubnetId": "subnet-dafc6f93",
                    "LoadBalancerAddresses": [
                        {}
                    ]
                },
                {
                    "ZoneName": "us-east-1c",
                    "SubnetId": "subnet-eed8a38b",
                    "LoadBalancerAddresses": [
                        {}
                    ]
                },
                {
                    "ZoneName": "us-east-1d",
                    "SubnetId": "subnet-f38b2bde",
                    "LoadBalancerAddresses": [
                        {}
                    ]
                }
            ],
            "SecurityGroups": [
                "sg-0620dc50979b05b24"
            ],
            "IpAddressType": "ipv4"
        }
    ]
}
Now we have to create a Listener
aws elbv2 create-listener –load-balancer-arn arn:aws:elasticloadbalancing:us-east-1:548754742764:loadbalancer/app/example-elb/3cb7c0ce850338d6 –protocol HTTP –port 80 –default-actions Type=forward,TargetGroupArn=arn:aws:elasticloadbalancing:us-east-1:548754742764:targetgroup/example-target-group/73e3f1b663022983
1
2
3
4
5
6
7
8
9
10
11
12
13
14
15
16
{
    "Listeners": [
        {
            "ListenerArn": "arn:aws:elasticloadbalancing:us-east-1:548754742764:listener/app/example-elb/3cb7c0ce850338d6/3feb5a5521aaae87",
            "LoadBalancerArn": "arn:aws:elasticloadbalancing:us-east-1:548754742764:loadbalancer/app/example-elb/3cb7c0ce850338d6",
            "Port": 80,
            "Protocol": "HTTP",
            "DefaultActions": [
                {
                    "Type": "forward",
                    "TargetGroupArn": "arn:aws:elasticloadbalancing:us-east-1:548754742764:targetgroup/example-target-group/73e3f1b663022983"
                }
            ]
        }
    ]
}
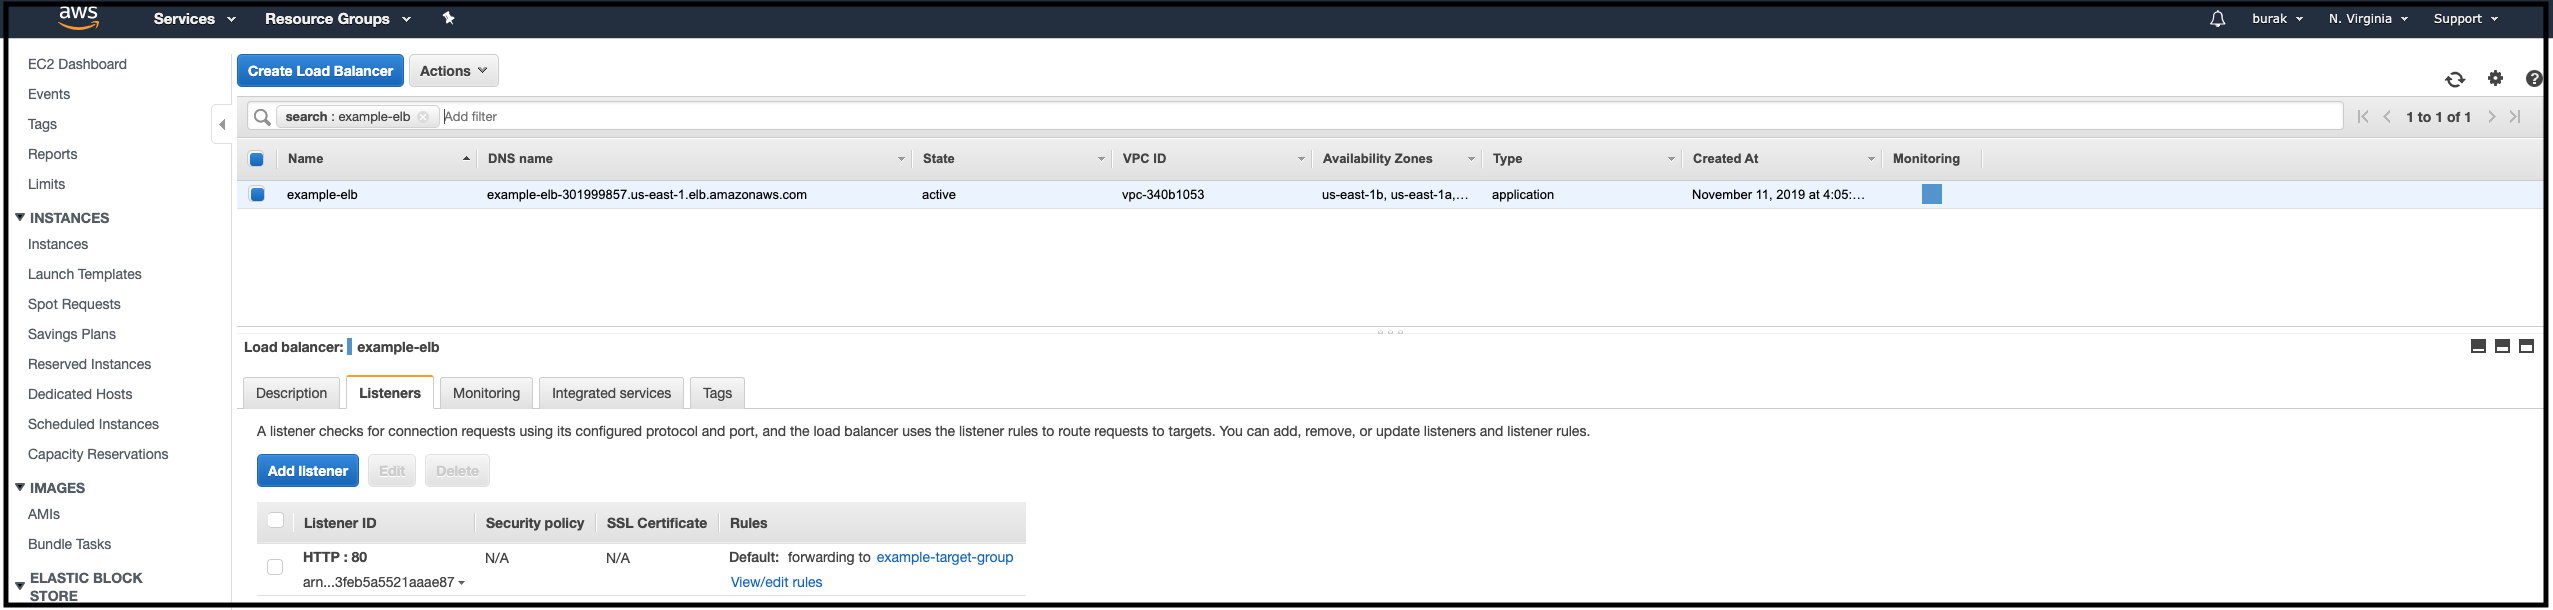
Our Elastic Load Balancer will have an attached Listener that can also verify from AWS Console.
Creating ECS Service
Finally we will create ECS service to run Tasks based on the Task Definition.
aws ecs create-service –cluster example-ecs-cluster –service-name example-ecs-service –task-definition nodejs-task-def –desired-count 1 –launch-type EC2 –load-balancers targetGroupArn=arn:aws:elasticloadbalancing:us-east-1:548754742764:targetgroup/example-target-group/73e3f1b663022983,containerName=node-app,containerPort=8080
1
2
3
4
5
6
7
8
9
10
11
12
13
14
15
16
17
18
19
20
21
22
23
24
25
26
27
28
29
30
31
32
33
34
35
36
37
38
39
40
41
42
43
44
45
46
47
{
    "service": {
        "serviceArn": "arn:aws:ecs:us-east-1:548754742764:service/example-ecs-service",
        "serviceName": "example-ecs-service",
        "clusterArn": "arn:aws:ecs:us-east-1:548754742764:cluster/example-ecs-cluster",
        "loadBalancers": [
            {
                "targetGroupArn": "arn:aws:elasticloadbalancing:us-east-1:548754742764:targetgroup/example-target-group/73e3f1b663022983",
                "containerName": "node-app",
                "containerPort": 8080
            }
        ],
        "serviceRegistries": [],
        "status": "ACTIVE",
        "desiredCount": 1,
        "runningCount": 0,
        "pendingCount": 0,
        "launchType": "EC2",
        "taskDefinition": "arn:aws:ecs:us-east-1:548754742764:task-definition/nodejs-task-def:2",
        "deploymentConfiguration": {
            "maximumPercent": 200,
            "minimumHealthyPercent": 100
        },
        "deployments": [
            {
                "id": "ecs-svc/9223370463372844213",
                "status": "PRIMARY",
                "taskDefinition": "arn:aws:ecs:us-east-1:548754742764:task-definition/nodejs-task-def:2",
                "desiredCount": 1,
                "pendingCount": 0,
                "runningCount": 0,
                "createdAt": 1573481931.594,
                "updatedAt": 1573481931.594,
                "launchType": "EC2"
            }
        ],
        "roleArn": "arn:aws:iam::548754742764:role/aws-service-role/ecs.amazonaws.com/AWSServiceRoleForECS",
        "events": [],
        "createdAt": 1573481931.594,
        "placementConstraints": [],
        "placementStrategy": [],
        "healthCheckGracePeriodSeconds": 0,
        "schedulingStrategy": "REPLICA",
        "enableECSManagedTags": false,
        "propagateTags": "NONE"
    }
}
Validating
Now it is time to validate our ECS cluster is healthy and works for the endpoints we defined. Also, lets go from bottom to top means we will first verify Docker container is deployed on our EC2 instance. After ssh into our EC2 instance we will verify docker is running.
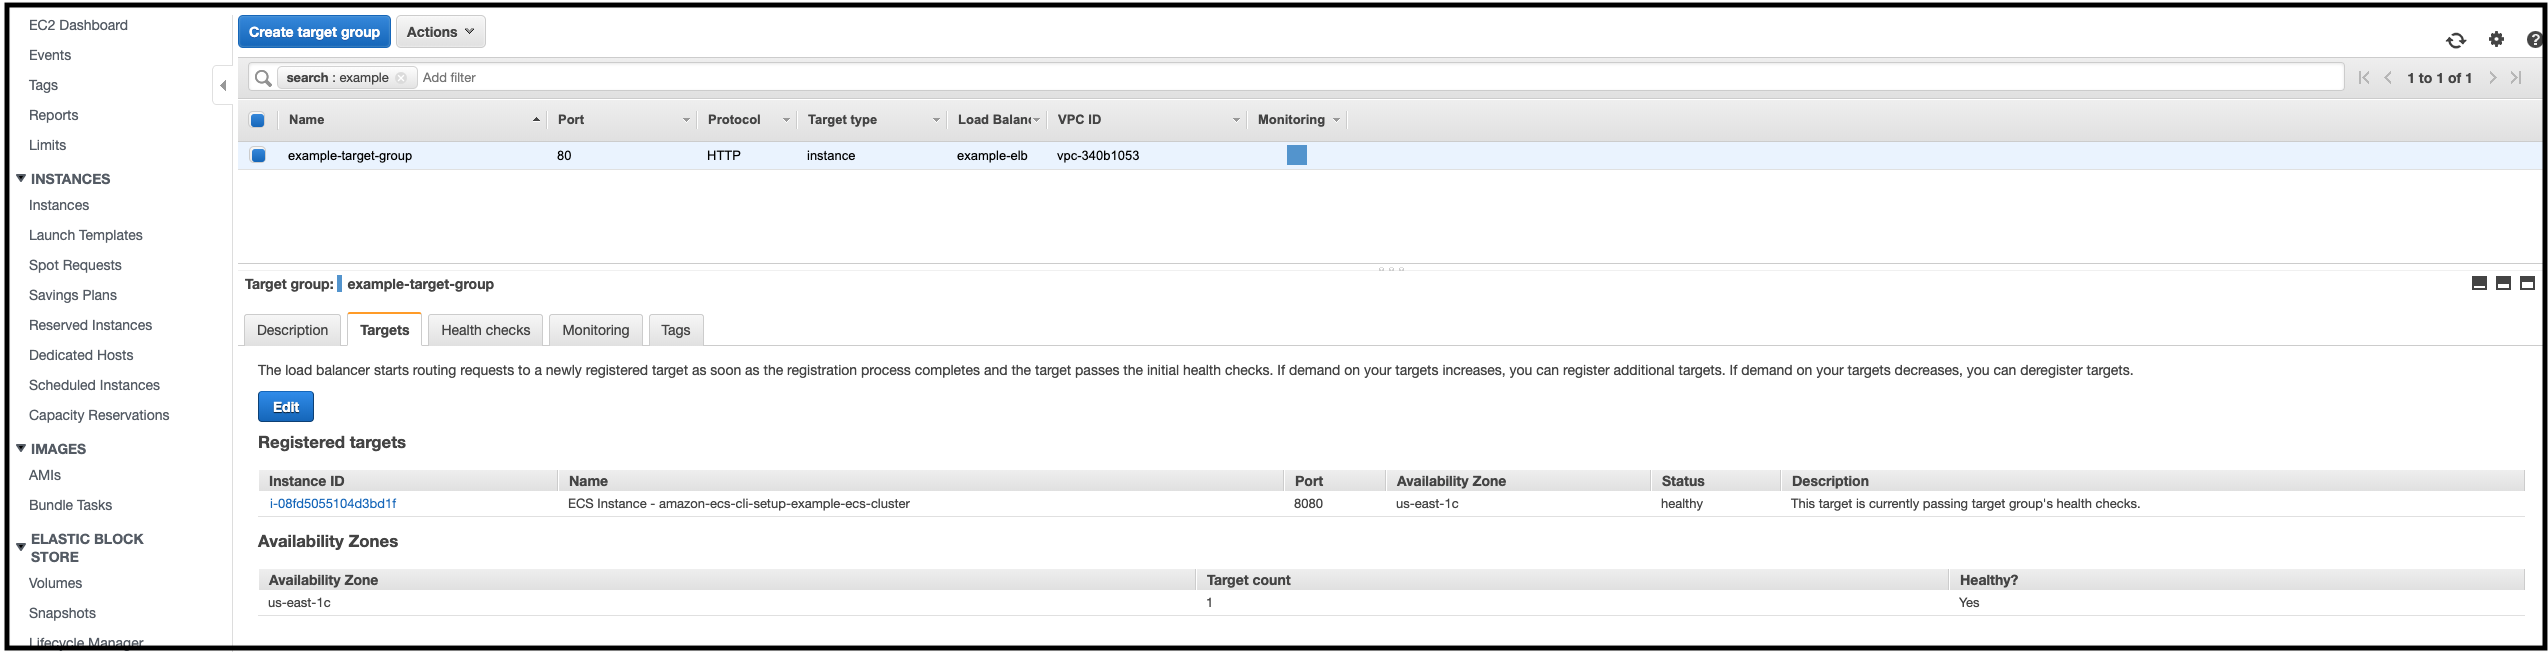
- Verify our ECS instances are registered to the Target Group we defined.
- Verify that docker containers running successfull inside ECS instances.
- Elastic Load Balancer forwards to requests from TCP 80 port to the endpoints we implemented.
Well for the Target Group we can directly check it from AWS Console.
Secondly, we will SSH into our EC2 instance and list docker containers running inside of it.
docker ps
1
2
3
CONTAINER ID        IMAGE                                                   COMMAND             CREATED             STATUS              PORTS                                        NAMES
6cdfbd73608d        548754742764.dkr.ecr.us-east-1.amazonaws.com/node-app   "node server.js"    7 days ago          Up 7 days           0.0.0.0:8080->8080/tcp   ecs-nodejs-web-1-nodejs-hi-eeda99df8084a4e04f00
22bd772ef8b6        amazon/amazon-ecs-agent:latest                          "/agent"            7 days ago          Up 7 days                                                        ecs-agent
We see our nodejs application is running and exposing port 8080. There is also another docker container running which is amazon/amazon-ecs-agent. This is the ECS agent we talked before which deployes and manages the lifecycle docker images on EC2 instances. Well basically if we run curl localhost:8080/hello-world we should have a successfull output
1
{"data":"Hello World"}
As the final verification step we will make a REST call to the /hello-world endpoint from ELB DNS name.
curl example-elb-301999857.us-east-1.elb.amazonaws.com/hello-world should return the same result.
We built our ECS cluster from deploying Docker images from our ECR repository by using EC2 instances.
Comments powered by Disqus.