
We will walk through how to create a CI/CD pipeline in AWS. Basically, CI/CD stands for Continuous Integration/Continuous Delivery which means whenever we push a new code change our pipeline will build the project, run the tests and deploy the new changes. In this tutorial we will use 4 AWS components;
- CodeCommit for code repository
- CodeBuild for continuous integration service to build and test our sources.
- CodeDeploy for continuous deployment to deploy new changes into our compute services which we will use Amazon EC2.
- CodePipeline for combining CodeBuild and CodeDeploy components to build a CI/CD pipeline.
Here is the architecture we will build
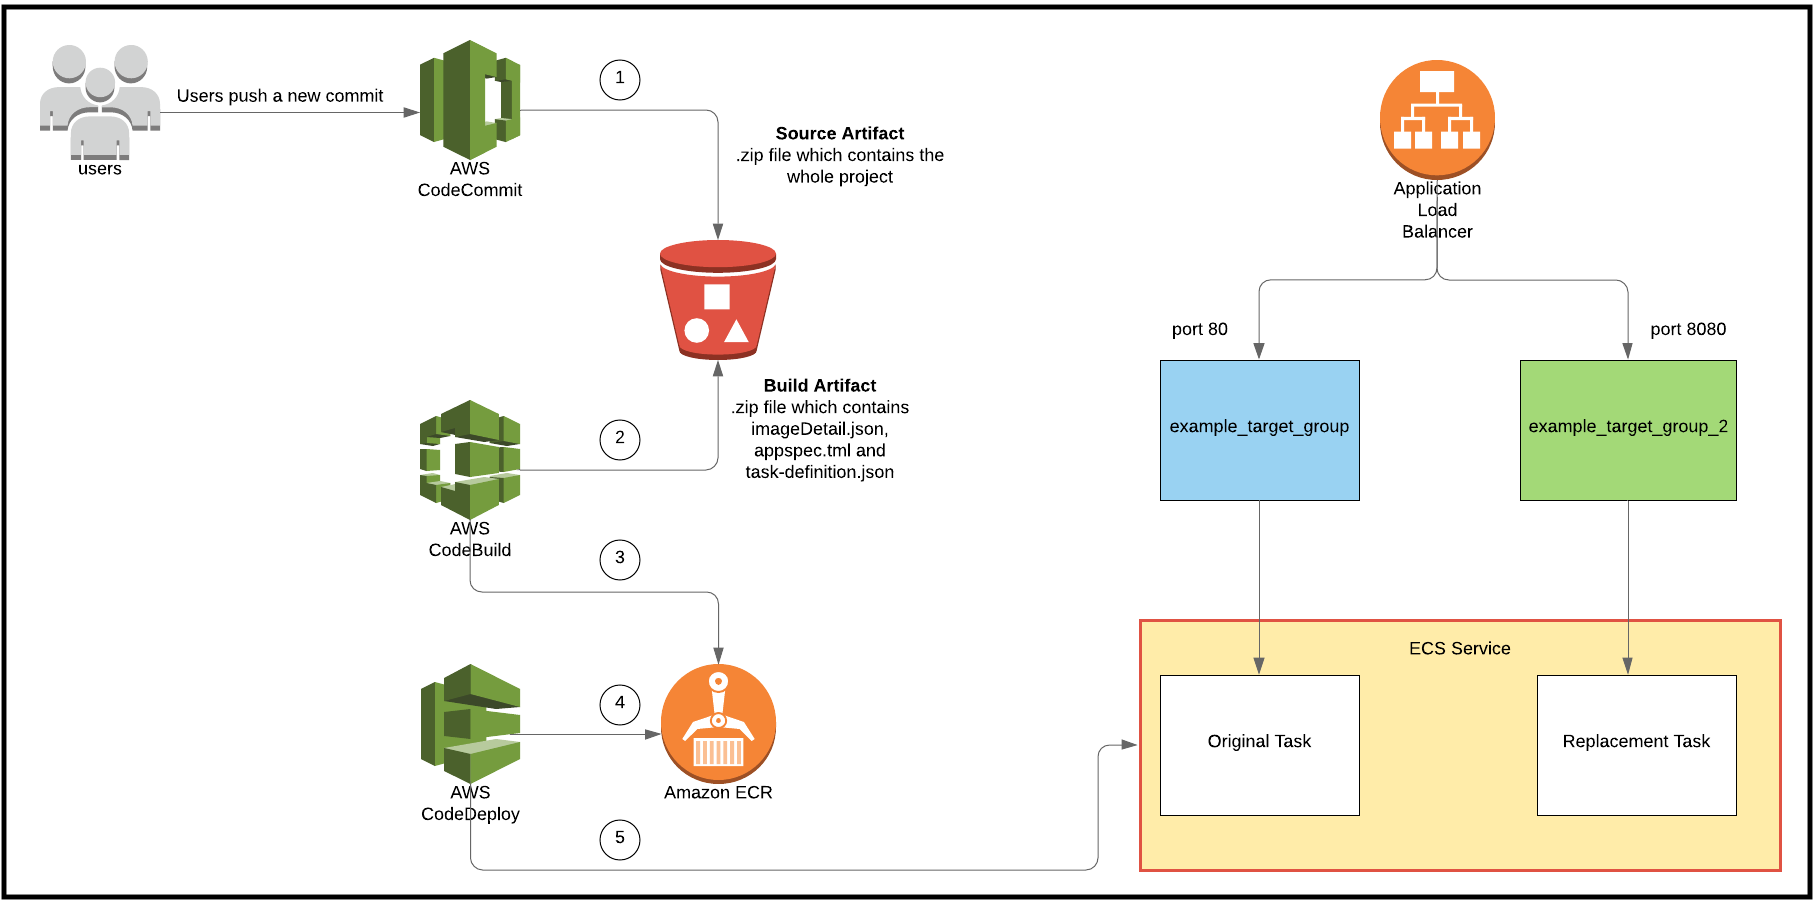
- Step 1 - AWS CodeCommit will generate a Source Artifact in S3 bucket
- Step 2 & 3 - AWS CodeBuild will run buildspec.yml. In this step, it will generate Build Artifact and also publish a new Docker image into ECR
- Step 4 & 5 - AWS CodeDeploy will get the new Docker image from ECR and start a new Blue/Green deployment.
CodeCommit
CodeCommit is an AWS service to host git repositories. First, we will create a git repository on CodeCommit. I will call repository name as nodejs-hello-world.
1
aws codecommit create-repository --repository-name nodejs-hello-world --repository-description "NodeJS example repository for CI/CD pipeline tutorial"
1
2
3
4
5
6
7
8
9
10
11
12
13
{
    "repositoryMetadata": {
        "accountId": "548754742764",
        "repositoryId": "eb65fb03-e509-4323-ba85-5fd11a46b84f",
        "repositoryName": "nodejs-hello-world",
        "repositoryDescription": "NodeJS example repository for CI/CD pipeline tutorial",
        "lastModifiedDate": 1574349435.803,
        "creationDate": 1574349435.803,
        "cloneUrlHttp": "https://git-codecommit.us-east-1.amazonaws.com/v1/repos/nodejs-hello-world",
        "cloneUrlSsh": "ssh://git-codecommit.us-east-1.amazonaws.com/v1/repos/nodejs-hello-world",
        "Arn": "arn:aws:codecommit:us-east-1:548754742764:nodejs-hello-world"
    }
}
You might need to configure your aws credentials for CodeCommit if you haven’t worked on CodeCommit before. So, I will skip this part and assume you already configured. Otherwise, you can follow the steps from AWS Guide.
After creating the repository we will now clone it to our local;
1
git clone ssh://git-codecommit.us-east-1.amazonaws.com/v1/repos/nodejs-hello-world
Now it is time to initialize our nodejs project and push the initial commit.
1
npm init
This is how package.json and server.js looks like;
1
2
3
4
5
6
7
8
9
10
11
12
13
14
{
  "name": "nodejs-hello-world",
  "version": "1.0.0",
  "description": "",
  "main": "server.js",
  "scripts": {
    "test": "echo \"Error: no test specified\" && exit 1"
  },
  "author": "",
  "license": "ISC",
  "dependencies": {
    "express": "^4.17.1"
  }
}
1
2
3
4
5
6
7
8
9
10
const express = require('express');
const app = express();
const port = 8080;

app.get('/hello-world', (req, res) => {
  console.log('New request received');
  res.send({'data': 'Hello World'});
});

app.listen(port, () => console.log(`Example app listening on port ${port}!`));
1
2
3
git add .
git commit -m "init commit"
git push
Elastic Container Registry
We will create a Docker registry in ECR which will keep the list of Docker images.
aws ecr create-repository –repository-name nodejs-hello-world
1
2
3
4
5
6
7
8
9
{
    "repository": {
        "repositoryArn": "arn:aws:ecr:us-east-1:548754742764:repository/nodejs-hello-world",
        "registryId": "548754742764",
        "repositoryName": "nodejs-hello-world",
        "repositoryUri": "548754742764.dkr.ecr.us-east-1.amazonaws.com/nodejs-hello-world",
        "createdAt": 1574436756.0
    }
}
After creating our ECR repository we will push our first image.
1
2
3
4
5
6
7
$(aws ecr get-login --no-include-email --region us-east-1)

docker build -t nodejs-cicd-example-registry .

docker tag nodejs-hello-world:latest 548754742764.dkr.ecr.us-east-1.amazonaws.com/nodejs-hello-world:latest

docker push 548754742764.dkr.ecr.us-east-1.amazonaws.com/nodejs-hello-world:latest
CodeBuild
AWS CodeBuild is the continuous integration service to build, run tests and produce our software artifacts. Our CodeBuild project will build the new commit we pushed and publish a new Docker image into our ECR repository. We will first create a CodeBuild project with a json file as an input. Then we will move to build our project.
aws codebuild create-project –cli-input-json file://create-codebuild.json
1
2
3
4
5
6
7
8
9
10
11
12
13
14
15
16
17
18
19
20
21
22
23
24
25
26
27
28
29
30
31
32
33
34
35
36
37
38
39
40
{
    "project": {
        "name": "nodejs-codebuild-project",
        "arn": "arn:aws:codebuild:us-east-1:548754742764:project/nodejs-codebuild-project",
        "description": "CodeBuild project for nodejs project",
        "source": {
            "type": "CODECOMMIT",
            "location": "https://git-codecommit.us-east-1.amazonaws.com/v1/repos/nodejs-hello-world",
            "insecureSsl": false
        },
        "artifacts": {
            "type": "NO_ARTIFACTS"
        },
        "cache": {
            "type": "NO_CACHE"
        },
        "environment": {
            "type": "LINUX_CONTAINER",
            "image": "aws/codebuild/standard:2.0-1.13.0",
            "computeType": "BUILD_GENERAL1_SMALL",
            "environmentVariables": [],
            "privilegedMode": true,
            "imagePullCredentialsType": "CODEBUILD"
        },
        "serviceRole": "arn:aws:iam::548754742764:role/CodeBuildPullECRImagesRole",
        "timeoutInMinutes": 5,
        "queuedTimeoutInMinutes": 480,
        "encryptionKey": "arn:aws:kms:us-east-1:548754742764:alias/aws/s3",
        "created": 1574436561.939,
        "lastModified": 1574436561.939,
        "badge": {
            "badgeEnabled": false
        },
        "logsConfig": {
            "cloudWatchLogs": {
                "status": "ENABLED"
            }
        }
    }
}
sourceis the part where we give our https git clone url. Here we are pointing to our CodeCommit git repository.artifactspart is for pointing out where to keep our built artifacts like in a S3 bucket.environmentpart is the place where define our project’s build environment. One thing to note here isprivilegedModehas to betrueif we will build Docker images.serviceRoleis the role CodeBuild will use to access any other AWS resources. In our case, CodeBuild should be granted access for ECR, CodeCommit and CloudWatch.
Just in case here is the CodeBuildPullECRImagesRole with its two attached policies.
1
2
3
4
5
6
7
8
9
10
11
12
13
14
15
16
17
18
19
20
21
22
23
24
25
26
27
28
29
30
31
32
33
34
35
36
{
    "Version": "2012-10-17",
    "Statement": [
        {
            "Sid": "VisualEditor0",
            "Effect": "Allow",
            "Action": [
                "ecr:GetDownloadUrlForLayer",
                "ecr:BatchGetImage",
                "ecr:CompleteLayerUpload",
                "ecr:UploadLayerPart",
                "ecr:InitiateLayerUpload",
                "ecr:BatchCheckLayerAvailability",
                "ecr:PutImage"
            ],
            "Resource": "arn:aws:ecr:us-east-1:548754742764:repository/nodejs-hello-world"
        },
        {
            "Sid": "VisualEditor1",
            "Effect": "Allow",
            "Action": [
                "ecr:GetAuthorizationToken",
                "codecommit:GitPull"
            ],
            "Resource": "*"
        },
        {
            "Sid": "VisualEditor2",
            "Action": [
                "logs:*"
            ],
            "Effect": "Allow",
            "Resource": "*"
        }
    ]
}
You can check AWS documentation for a more detailed codebuild configuration.
After creating our build project in CodeBuild we will create a file called buildspec.yml to describe phases and commands to run for each phase during the build. This is the place we will login into ECR repository, build and tag our Docker image from Dockerfile, and push the new image into our ECR repository. One important point to note here is including the necessary files into Output Artifact which will be used by CodeDeploy application later. We will include 3 files;
- imageDetails.json - This is the file Amazon ECS deploy action expects to generate a new task definition file. It has only one field
ImageURIand it will replace thisImageURIwithIMAGE1_NAMEparameter in task-definition.json we will create. You can find a more detailed reference for image definitions. imageDetails.json will be created inpost-buildphase. - appspec.yml - This is the yml file to be used by CodeDeploy to run tasks on ECS cluster.
- task-definition.json
1
2
3
4
5
6
7
8
9
10
11
12
13
14
15
16
17
18
19
20
21
22
23
24
25
26
27
28
29
30
31
32
33
34
version: 0.2
env:
  variables:
    CONTAINER_NAME: "nodejs-hello-world"
phases:
  install:
    runtime-versions:
      nodejs: 10
    commands:
      - echo installing nodejs 10
  pre_build:
    commands:
      - echo logging into AWS ECR...
      - $(aws ecr get-login --no-include-email --region us-east-1)
      - REPOSITORY_URI=548754742764.dkr.ecr.us-east-1.amazonaws.com/nodejs-hello-world
      - COMMIT_HASH=$(echo $CODEBUILD_RESOLVED_SOURCE_VERSION | cut -c 1-7)
      - IMAGE_TAG=${COMMIT_HASH:=latest}
  build:
    commands:
      - echo building the Docker image on `date`
      - docker build -t $REPOSITORY_URI:latest .
      - docker tag $REPOSITORY_URI:latest $REPOSITORY_URI:$IMAGE_TAG
      - echo Writing image defitions into imagedefinitions.json file.
  post_build:
    commands:
      - echo Building the Docker image completed on `date`
      - echo Pushing the Docker image with tag latest into ECR...
      - docker push $REPOSITORY_URI:$IMAGE_TAG
      - printf '{"ImageURI":"%s"}' $REPOSITORY_URI:$IMAGE_TAG > imageDetail.json
artifacts:
  files:
    - imageDetail.json
    - task-definition.json
    - appspec.yml
Spin Up ECS Cluster
We saw how to spin up an ECS Cluster to deploy Docker containers on EC2 instances by creating Elastic Load Balancer with Target Group and ECS Cluster with ECS Service on my previous post. We will follow the same steps except there are a couple of small changes we need to make on our task definition. First, we won’t define any hostPort in portMappings section to enable dynamic port mapping. Dynamic port mapping for Amazon ECS makes it easier to run multiple tasks on the same ECS service. In this case, multiple tasks refers to Original task and Replacement task generated for Blue/Green deployment. So, whenever there is a new ECR image created, a new task will be created to run along with previous task on same ECS service where it has one EC2 instance. Otherwise, we will have port conflict issue during the deployment.
Now, this was the json we used to register our Task Definition.
1
2
3
4
5
6
7
8
9
10
11
12
13
14
15
16
17
18
19
{
    "containerDefinitions": [
      {
        "name": "node-app",
        "image": "548754742764.dkr.ecr.us-east-1.amazonaws.com/nodejs-hello-world",
        "memory": 512,
        "cpu": 128,
        "essential": true,
        "portMappings": [
          {
             "containerPort": 8080,
             "protocol": "tcp"
          }
        ]
      }
    ],
    "family": "nodejs-hello-world-task-def",
    "taskRoleArn": "arn:aws:iam::548754742764:role/ecsTaskExecutionRole"
}
Now after creating and registering it to our new ECS cluster we will replace image value with <IMAGE1_NAME> which will become
1
2
3
4
5
6
7
8
9
10
11
12
13
14
15
{
  "containerDefinitions": [{
    "name": "node-app",
    "image": "<IMAGE1_NAME>",
    "memory": 512,
    "cpu": 128,
    "essential": true,
    "portMappings": [{
      "containerPort": 8080,
      "protocol": "tcp"
    }]
  }],
  "family": "nodejs-hello-world-task-def",
  "taskRoleArn": "arn:aws:iam::548754742764:role/ecsTaskExecutionRole"
}
We can then push new task-definition.json change into our code repository. Before creating ECS Service we should have an Application Load Balancer with two Target Groups to listen on ports 80 and 8080. I skipped this part because my previous blog explains how to create an ELB with target groups.
When creating ECS service we will have deployment-controller set to CODE_DEPLOY and we will use one Target Group because multiple Target Groups are not supported for CODE_DEPLOY type services.
1
aws ecs create-service --cluster example-ecs-cluster --service-name example-ecs-service --task-definition nodejs-hello-world-task-def --desired-count 1 --deployment-controller type=CODE_DEPLOY --launch-type EC2 --load-balancers targetGroupArn=arn:aws:elasticloadbalancing:us-east-1:548754742764:targetgroup/example-target-group/0f9efaeceb63ac61,containerName=nodejs-hello-world,containerPort=8080
1
2
3
4
5
6
7
8
9
10
11
12
13
14
15
16
17
18
19
20
21
22
23
24
25
26
27
28
29
30
31
32
33
34
35
36
37
38
39
40
41
42
43
44
45
46
47
48
49
50
51
52
53
54
55
56
57
58
59
60
{
  "service": {
    "serviceArn": "arn:aws:ecs:us-east-1:548754742764:service/example-ecs-service",
    "serviceName": "example-ecs-service",
    "clusterArn": "arn:aws:ecs:us-east-1:548754742764:cluster/example-ecs-cluster",
    "loadBalancers": [{
      "targetGroupArn": "arn:aws:elasticloadbalancing:us-east-1:548754742764:targetgroup/example-target-group/0f9efaeceb63ac61",
      "containerName": "nodejs-hello-world",
      "containerPort": 8080
    }],
    "serviceRegistries": [],
    "status": "ACTIVE",
    "desiredCount": 1,
    "runningCount": 0,
    "pendingCount": 0,
    "launchType": "EC2",
    "taskDefinition": "arn:aws:ecs:us-east-1:548754742764:task-definition/nodejs-hello-world-task-def:23",
    "deploymentConfiguration": {
      "maximumPercent": 200,
      "minimumHealthyPercent": 100
    },
    "taskSets": [{
      "id": "ecs-svc/9223370461212859254",
      "taskSetArn": "arn:aws:ecs:us-east-1:548754742764:task-set/example-ecs-cluster/example-ecs-service/ecs-svc/9223370461212859254",
      "status": "PRIMARY",
      "taskDefinition": "arn:aws:ecs:us-east-1:548754742764:task-definition/nodejs-hello-world-task-def:23",
      "computedDesiredCount": 1,
      "pendingCount": 0,
      "runningCount": 0,
      "createdAt": 1575641916.534,
      "updatedAt": 1575641916.534,
      "launchType": "EC2",
      "loadBalancers": [{
        "targetGroupArn": "arn:aws:elasticloadbalancing:us-east-1:548754742764:targetgroup/example-target-group/0f9efaeceb63ac61",
        "containerName": "nodejs-hello-world",
        "containerPort": 8080
      }],
      "serviceRegistries": [],
      "scale": {
        "value": 100.0,
        "unit": "PERCENT"
      },
      "stabilityStatus": "STABILIZING",
      "stabilityStatusAt": 1575641916.534
    }],
    "deployments": [],
    "roleArn": "arn:aws:iam::548754742764:role/aws-service-role/ecs.amazonaws.com/AWSServiceRoleForECS",
    "events": [],
    "createdAt": 1575641916.534,
    "placementConstraints": [],
    "placementStrategy": [],
    "healthCheckGracePeriodSeconds": 0,
    "schedulingStrategy": "REPLICA",
    "deploymentController": {
      "type": "CODE_DEPLOY"
    },
    "enableECSManagedTags": false,
    "propagateTags": "NONE"
  }
}
CodeDeploy
CodeDeploy is a deployment service to configure and automate deployments on given targets like EC2 instances, AWS Lambda functions or ECS services. In this use case we will of course use ECS type deployments. This is the place we will point the two Target Group we created. One for production port and other one for test port.
1
aws deploy create-application --application-name nodejs-hello-world-codedeploy --compute-platform ECS
1
2
3
{
  "applicationId": "8547a900-0da1-4d18-99d1-ee36db90f58d"
}
Now we will create a deployment group for our deployment application;
1
aws deploy create-deployment-group --cli-input-json file://create-deployment-group.json
1
2
3
{
  "deploymentGroupId": "d24efd84-eddf-4f92-bba0-3b3c02ad26ae"
}
The input file can found here and the CodeDeploy reference can be found here
CodePipeline
As the final step we will create and configure CodePipeline by combining the components we talked about earlier. Our pipeline will have 3 stages;
- Source - This the stage we point our GIT repository which is
nodejs-hello-world. So, whenever there is a new commit pushed then this pipeline will get triggered. - Build - This is the part
buildspec.ymlwill run to build and push Docker images into ECR. Additionally, it will create an artifact which contains 3 files; imageDetail.json, task-definition.json and appspec.yml. - Deploy - This stage is the core side of our Blue/Green deployment.
1
aws codepipeline create-pipeline --cli-input-json file://create-codepipeline.json
1
2
3
4
5
6
7
8
9
10
11
12
13
14
15
16
17
18
19
20
21
22
23
24
25
26
27
28
29
30
31
32
33
34
35
36
37
38
39
40
41
42
43
44
45
46
47
48
49
50
51
52
53
54
55
56
57
58
59
60
61
62
63
64
65
66
67
68
69
70
71
72
73
74
75
76
77
78
79
80
81
82
83
84
85
86
{
  "pipeline": {
    "name": "nodejs-codepipeline",
    "roleArn": "arn:aws:iam::548754742764:role/service-role/AWSCodePipelineServiceRole-us-east-1-express-pipeline",
    "artifactStore": {
      "type": "S3",
      "location": "codepipeline-us-east-1-493918737827"
    },
    "stages": [{
      "name": "Source",
      "actions": [{
        "name": "Source",
        "actionTypeId": {
          "category": "Source",
          "owner": "AWS",
          "provider": "CodeCommit",
          "version": "1"
        },
        "runOrder": 1,
        "configuration": {
          "BranchName": "master",
          "PollForSourceChanges": "false",
          "RepositoryName": "nodejs-hello-world"
        },
        "outputArtifacts": [{
          "name": "SourceArtifact"
        }],
        "inputArtifacts": [],
        "region": "us-east-1"
      }]
    },
      {
        "name": "Build",
        "actions": [{
          "name": "Build",
          "actionTypeId": {
            "category": "Build",
            "owner": "AWS",
            "provider": "CodeBuild",
            "version": "1"
          },
          "runOrder": 1,
          "configuration": {
            "ProjectName": "nodejs-codebuild-project"
          },
          "outputArtifacts": [{
            "name": "BuildArtifact"
          }],
          "inputArtifacts": [{
            "name": "SourceArtifact"
          }],
          "region": "us-east-1"
        }]
      },
      {
        "name": "Deploy",
        "actions": [{
          "name": "Deploy",
          "actionTypeId": {
            "category": "Deploy",
            "owner": "AWS",
            "provider": "CodeDeployToECS",
            "version": "1"
          },
          "runOrder": 1,
          "configuration": {
            "AppSpecTemplateArtifact": "BuildArtifact",
            "AppSpecTemplatePath": "appspec.yml",
            "ApplicationName": "nodejs-hello-world-codedeploy",
            "DeploymentGroupName": "nodejs-hello-world-deployment-group",
            "Image1ArtifactName": "BuildArtifact",
            "Image1ContainerName": "IMAGE1_NAME",
            "TaskDefinitionTemplateArtifact": "BuildArtifact",
            "TaskDefinitionTemplatePath": "task-definition.json"
          },
          "outputArtifacts": [],
          "inputArtifacts": [{
            "name": "BuildArtifact"
          }],
          "region": "us-east-1"
        }]
      }
    ],
    "version": 1
  }
}
After creating the codepipeline we can release a new change to verify that everything works as expected.

Validating
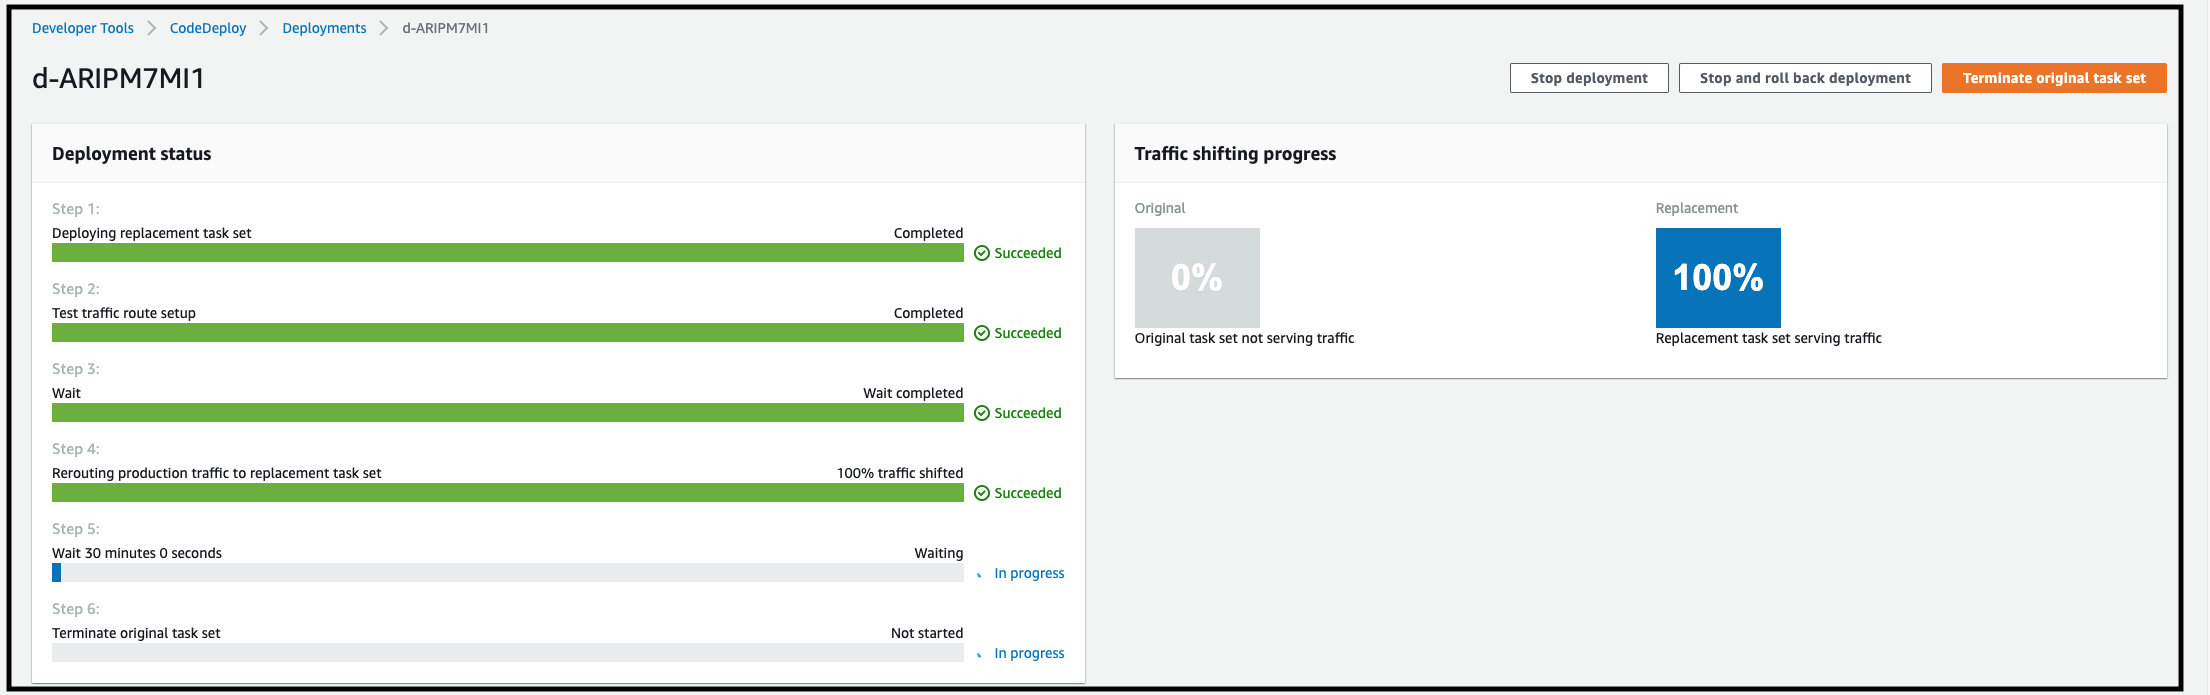
Now we only have one api which is the hello-world endpoint. We will add another api v2/hello-world and verify that during the deployment port 8080 will point to the new revision where port 80 points the current revision. After pushing the new change our Deployment with test traffic enabled will look like;

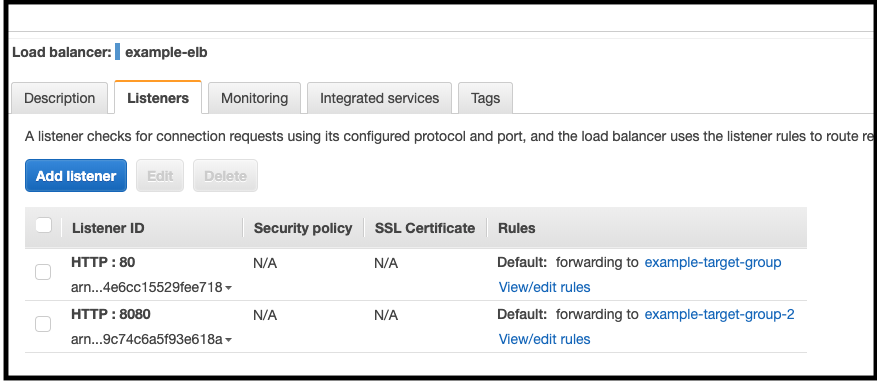
Here we can see two target groups attached to the ALB as well. One points to port 80 and other one points to 8080
curl curl example-elb-162160344.us-east-1.elb.amazonaws.com:8080/v2/hello-world
1
{"data":"Hello World from version 2!"}
On the other hand, if we send the same request to the production port (80 in this case) then server will return 404 error becauase production target group still points to the old revision.
1
curl -i example-elb-162160344.us-east-1.elb.amazonaws.com:80/v2/hello-world
1
2
3
4
5
6
7
8
9
10
11
12
13
14
15
16
17
18
19
HTTP/1.1 404 Not Found
Date: Tue, 17 Dec 2019 10:01:03 GMT
Content-Type: text/html; charset=utf-8
Content-Length: 153
Connection: keep-alive
X-Powered-By: Express
Content-Security-Policy: default-src 'none'
X-Content-Type-Options: nosniff

<!DOCTYPE html>
<html lang="en">
<head>
<meta charset="utf-8">
<title>Error</title>
</head>
<body>
<pre>Cannot GET /v2/hello-world</pre>
</body>
</html>
After waiting 15 minutes target group with production will also point to the new revision and we will have 30 minutes to test production. If something goes wrong we will be able to rollback. Here is the deployment looks like after routing production traffic into new revision;
If we check ALB we will see that now there is only one Target Group pointing both test and prod ports.

Now lets another curl request to verify production serves from correct revision.
1
curl example-elb-162160344.us-east-1.elb.amazonaws.com:80/v2/hello-world
1
2
3
{
  "data": "Hello World from version 2!"
}
Everything works as expected. After 30 minutes the old Task will be terminated on ECS cluster and new Task will be the permanent one. In this tutorial, we saw how to build a CI/CD pipeline with Blue/Green deployment type on ECS cluster. Feel free to ask any questions if you have. Additionally, you can find the resources from my github
Comments powered by Disqus.