
We created a Cognito User Pool and demonstrated a simple authentication by registering and logging in a new user in my previous tutorial. Now we will take a step further by adding a common OAuth
authorization step which is OAuth Authorization Code Flow with a super simple web app. With this example we will see how our web app can call protected APIs. These are the resources we will provision;
- Create a AWS Cognito User Pool
- Create a AWS Cognito App Client with Authorization Code Flow
- Create a Resource Server (with a custom Cognito Domain)
- Create a protected API from API Gateway
- Verify that authenticated user is able to call the protected API with provided jwt tokens.
Now before deep diving into examples lets first understand how OAuth Authorization Code Flow works which is a redirection based flow. First of all, OAuth 2.0 (Open Authorization) is an authorization protocol for accessing secured resources. After a user
is authorized an access token is being issued generally in JWT format. This access token has an expiry date which is configurable. So, after the token is expired user has to obtain a new access token to continue calling protected resources. Moreover,
each protected resource may also require OAuth 2.0 Scopes. Scopes are a way to limit access for an access token. For example; some access tokens may be granted read and write access for protected resource, on the other hand, some will only have read access. Authorization Code
Flow is an OAuth 2.0 flow based on a redirection (redirect URI) from the Authorization server to exchange returned code with an access token.
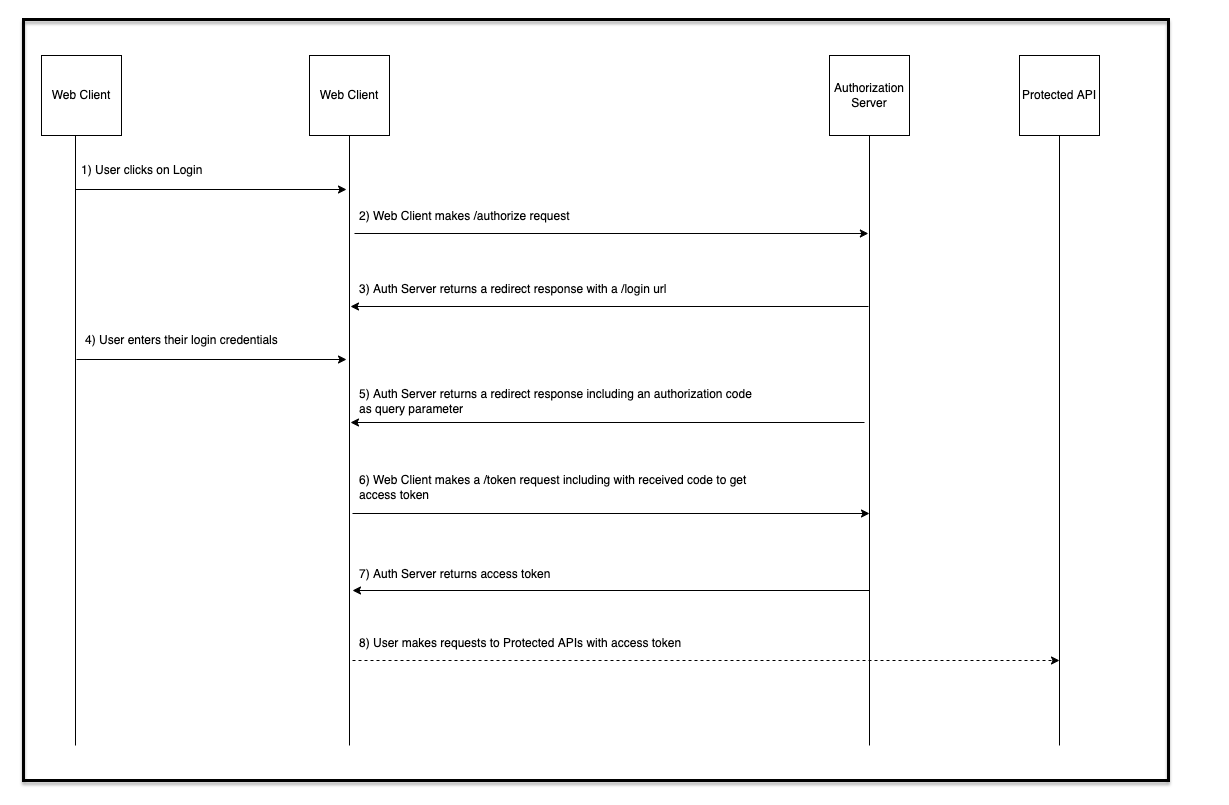
- User clicks on Login page on the Web Client.
- Web Client makes an
/authorizerequest to initiate Authorization Code Flow. This is a GET request includingclient_id,redirect_uri,response_typeandscope(optional) query parameters. - Authorization Server returns a redirect response with a
/loginendpoint where the user will be redirected to enter their credentials. - User enters their credentials through a Hosted UI.
- Authorization Server redirects user back to given
redirect_uriafter a successful login with an url containing acodequery parameter. Thiscodewill be used later on for exchanging it with an access token. - Web Client will make a
/tokenendpoint request by including the returnedcodeto get an access token. - Auth Server will return an access token (along with id token and refresh token if configured).
- User will be able to call protected APIs by using given access token.
Here is the same representation of Authorization Code Flow by using AWS architecture including different resources;
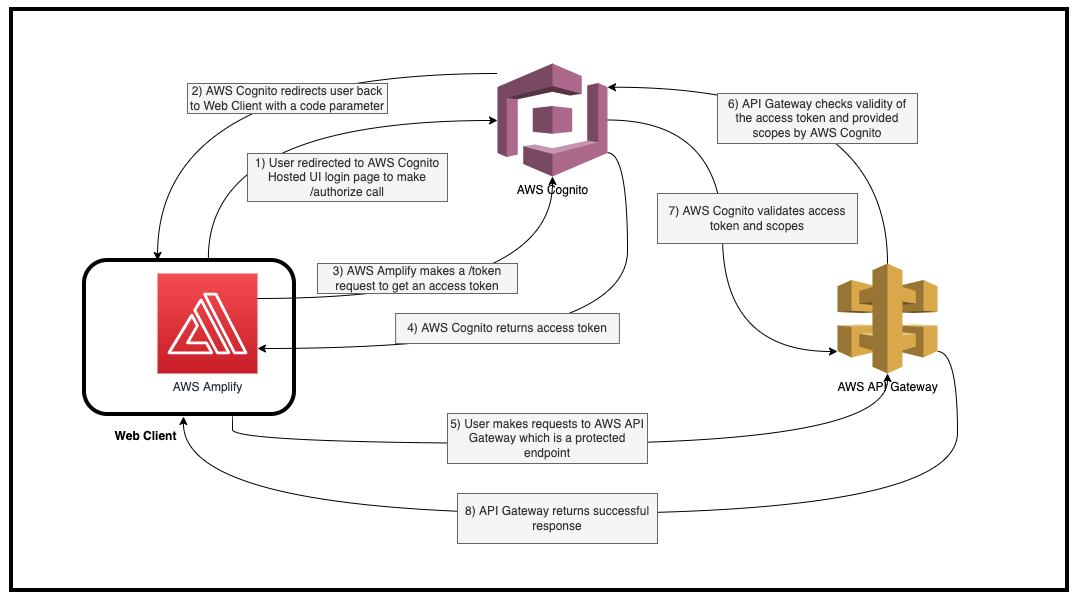
- User clicks on the login page which makes an
/authorizecall by the browser. - AWS Cognito will return a redirect response for a login url and user will be asked for entering their credentials.
- After a successful login, Cognito Hosted UI will redirect user back to Web Client with a URL containing a
codeparameter. - AWS Amplify will handle this redirection behind the scenes and will make a
/tokencall to exchange the returnedcodeparameter with a valid access token. - AWS Cognito will return a valid access token (along with id and refresh tokens which are optional)
- User can call protected resources with returned access token.
- Once API Gateway receive the request it will pass the access token and scopes to AWS Cognito for checking their validity.
- AWS Cognito will confirm if the tokens and scopes are valid.
- Finally, API Gateway will return a success response back to Web Client.
Login Flow
We will demonstrate a login flow with two different ways which will be from a web client and by making http requests with curl commands.
1) Web Client
I will go through with a very simple react app I implemented only for this project. You can find the related repository from here
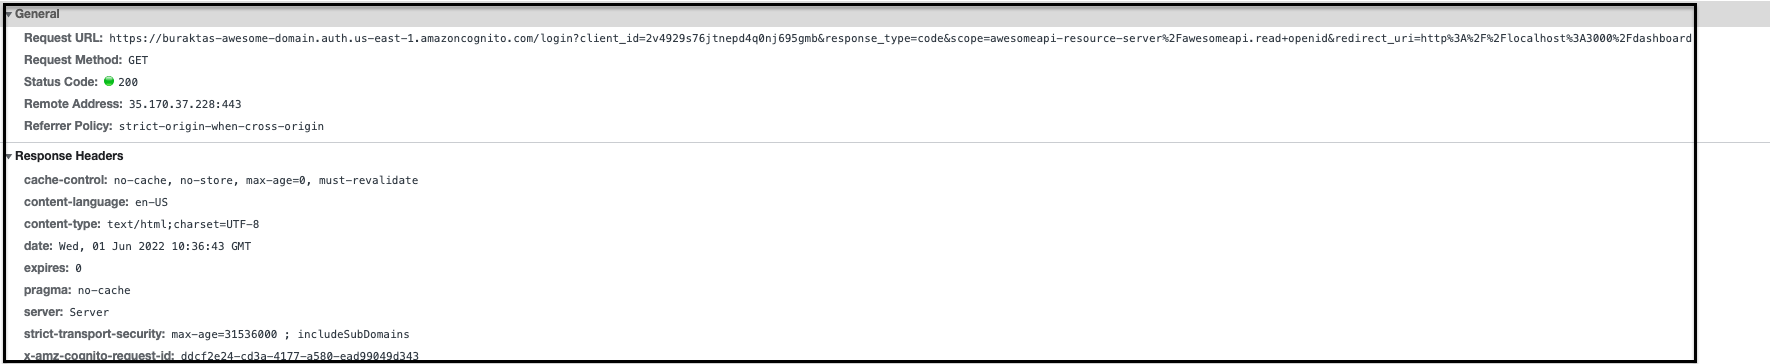
Well as like any other web app we have a landing page containing only one Login button. Once, a user clicks on it they will be redirected to the Cognito Hosted UI. This URL is hardcoded which you can obtain from AWS Hosted UI Console and looks like
https://buraktas-awesome-domain.auth.us-east-1.amazoncognito.com/oauth2/authorize?client_id=2v4929s76jtnepd4q0nj695gmb&response_type=code&scope=awesomeapi-resource-server%2Fawesomeapi.read+openid&redirect_uri=http%3A%2F%2Flocalhost%3A3000%2Fdashboard

After clicking on login button browser makes an /authorize request and Cognito returns a redirect response with a URL (in location header) pointing to a login page from their Hosted UI.

Browser will redirect user to the login page which includes query parameters;
- client_id
- response_type
- scope
- redirect_uri
This is the Cognito Hosted UI login page. User will be redirected back to the redirect_uri provided after they enter their credentials with a code query parameter.

AWS Cognito returns a redirect response.
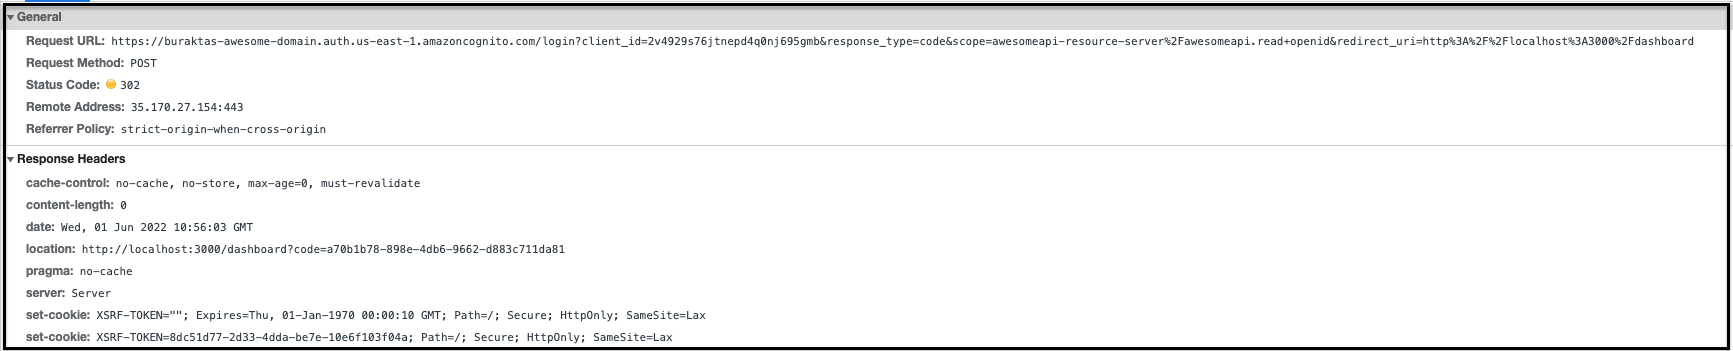
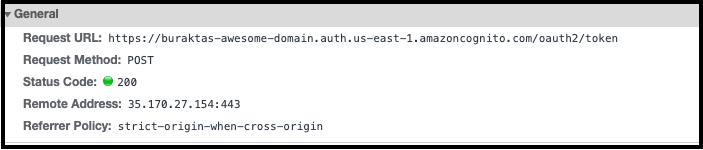
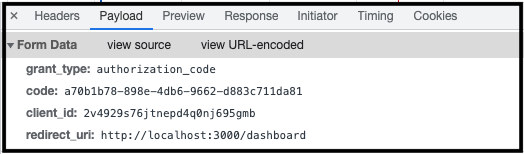
AWS Amplify will make /token request behind the scenes after the user is redirected back to the web client. Later on, user will get a valid access token.
User will get the valid tokens
1
2
3
4
5
6
7
{
  "id_token": "eyJraWQiOiJNd3Q...",
  "access_token": "eyJraWQiOi...",
  "refresh_token": "eyJjdHkiOi...",
  "expires_in": 3600,
  "token_type": "Bearer"
}
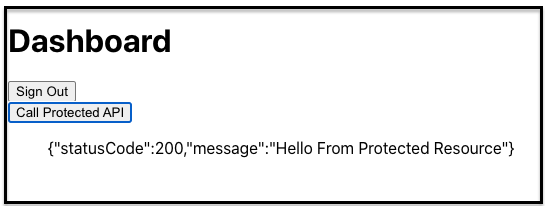
As the final step, user is able to call protected APIs. Here is the super simple Dashboard page which contains a button to make a call to our protected API. Once we click on it we will see a success response.
2) Curl Commands
We can assume user enters their credentials through a browser and redirected back to the web client with a URL like;
http://localhost:3000/dashboard?code=426e230c-ad12-4112-ab0e-9685e8ef9ac9
Here is the Curl request to the /token endpoint we use;
1
2
3
4
5
6
> curl --location --request POST 'https://buraktas-awesome-domain.auth.us-east-1.amazoncognito.com/oauth2/token' \
--header 'Content-Type: application/x-www-form-urlencoded' \
--data-urlencode 'client_id=2v4929s76jtnepd4q0nj695gmb' \
--data-urlencode 'code=1169af5a-c718-45cb-8beb-ca05e5509550' \
--data-urlencode 'grant_type=authorization_code' \
--data-urlencode 'redirect_uri=http://localhost:3000/dashboard'
And here below is the response with a short format. We can see main the attributes scope, client_id and username if we decode the access token.
1
2
3
4
5
6
7
{
  "access_token": "eyJraWQiOiJyOVBsUVF1SUtsMlwvcEt2ZXhlWjQ5dVlMXC81THRxR2o5UElFb3o3MEJueUk9IiwiYWxnIjoiUlMyNTYifQ.eyJzdWIiOiIyN2I4MDBiYy00NDdkLTRhY2ItYTIwNi0zYmYzNTY4MzZmZmMiLCJpc3MiOiJodHRwczpcL1wvY29nbml0by1pZHAudXMtZWFzdC0xLmFtYXpvbmF3cy5jb21cL3VzLWVhc3QtMV9QdjhQcG01elEiLCJ2ZXJzaW9uIjoyLCJjbGllbnRfaWQiOiIydjQ5MjlzNzZqdG5lcGQ0cTBuajY5NWdtYiIsIm9yaWdpbl9qdGkiOiI2MWJjZjIyZC1mYmEyLTQyYzgtYTg2MS1lMTE0NjQxYmIwODMiLCJldmVudF9pZCI6ImUxNjQxM2EzLTJjOTctNDYwMS05ZDJkLTc3MGY1NjRjNWZjMiIsInRva2VuX3VzZSI6ImFjY2VzcyIsInNjb3BlIjoiYXdlc29tZWFwaS1yZXNvdXJjZS1zZXJ2ZXJcL2F3ZXNvbWVhcGkucmVhZCBvcGVuaWQiLCJhdXRoX3RpbWUiOjE2NTQwODUxMzEsImV4cCI6MTY1NDA4ODczMSwiaWF0IjoxNjU0MDg1MTMxLCJqdGkiOiI5ZDk4YzY5Ni1mYjMxLTQ0YzQtYmRlZi1iNmZmMzFjMGUxOTEiLCJ1c2VybmFtZSI6IjI3YjgwMGJjLTQ0N2QtNGFjYi1hMjA2LTNiZjM1NjgzNmZmYyJ9.k8Go2FUcObywizvrVUfdU0rYSyFyNJgAN-rwjL6WTzgocc5vm3giu2hRfhfS57iz9Z59XevO5vzF5xnuLXiz156WgwR6U5Yo8ku-ZTLhEzXHN1wXy82VLoFaKZXJod9fjpI0vCCoNpsRKHGzteaHI5PRN7r1td0aHgKZX8VKwZovsLQueEqwHQGh1f6FWXaygvm_uRF5X43dNUAy_j8n4gv9X4hMm7CKJSS4bm0MzeptV7Z1eCD3sCuWANq4SCHpXL4TvpROpoF26Tt9ZaGoQy6xUiM0K-v2TWU1kTYcQpXtXlq3UDrE4RV3xG4R3lg5G5HwzCgxwlAbz-8IpJl-Mg",
  "id_token": "eyJraWQiOiJNd3Q...",
  "refresh_token": "eyJjdHkiOiJ...",
  "expires_in": 3600,
  "token_type": "Bearer"
}
Now user is able to call protected APIs. We have a GET API which requires a scope of awesomeapi-resource-server/awesomeapi.read. Of course, this scope doesn’t come by default. It is the way that I configured the Resource Server for granting access with this scope and
provisioned an API which checks if the access token has it (Remember the step API Gateway checks the validity of the access token).
1
2
> curl --request GET 'https://u9l0thnf46.execute-api.us-east-1.amazonaws.com/prod/awesomeapi' \
--header 'Authorization: eyJraWQiOiJyOVBsUVF1SUtsMlwvcEt2ZXhlWjQ5dVlMXC81THRxR2o5UElFb3o3MEJueUk9IiwiYWxnIjoiUlMyNTYifQ.eyJzdWIiOiIyN2I4MDBiYy00NDdkLTRhY2ItYTIwNi0zYmYzNTY4MzZmZmMiLCJpc3MiOiJodHRwczpcL1wvY29nbml0by1pZHAudXMtZWFzdC0xLmFtYXpvbmF3cy5jb21cL3VzLWVhc3QtMV9QdjhQcG01elEiLCJ2ZXJzaW9uIjoyLCJjbGllbnRfaWQiOiIydjQ5MjlzNzZqdG5lcGQ0cTBuajY5NWdtYiIsIm9yaWdpbl9qdGkiOiI4MDFiMjAwZC1lYzljLTQ3ZmMtYmMzOS0yN2Q5ZjAyOWFjNjUiLCJldmVudF9pZCI6IjhmZGMyZDdiLWVkMTUtNGI0Yi04NDc1LWQ5NTE1MDAzZDUzNCIsInRva2VuX3VzZSI6ImFjY2VzcyIsInNjb3BlIjoiYXdlc29tZWFwaS1yZXNvdXJjZS1zZXJ2ZXJcL2F3ZXNvbWVhcGkucmVhZCBvcGVuaWQiLCJhdXRoX3RpbWUiOjE2NTQxMDQ0NTYsImV4cCI6MTY1NDEwODA1NiwiaWF0IjoxNjU0MTA0NDU3LCJqdGkiOiI4MjY1ZjhhOC1jMGYyLTRiZjctODYyNS1iMjIyMjA5OTM3NDciLCJ1c2VybmFtZSI6IjI3YjgwMGJjLTQ0N2QtNGFjYi1hMjA2LTNiZjM1NjgzNmZmYyJ9.BmBLqhShOiuhD8Q2zAVK0M3qtBENXVzgiCpfw5W839M6oFBcWkNCaTnUJubujhu4FpUHDVssDY1CTW0CbJS4ULrj1vcnwZSALF-AcNQjxyMC2xNhqCo_r92fGm66txnUZzWftdN_Tg62mgEprflZ0tVR-PU9cbAI-DDko5fUUANkR1CSDQf0A36cW3ttkb4N0PxyAWHmKezn7dX62l1uha4THuWci8MB2t7G06u5SM2f2azOdFlCAy5Ai-fgvlJK_jYqPBPY-K__N3tjVJq9DfIEWtgHnOhwCPsAhByBZdFSEuuLTGFtWrhCcv9m6DasGc76h03coBTQPFSv2raAcA'
Response
1
2
3
4
{
  "statusCode": 200,
  "message": "Hello From Protected Resource"
}
CDK Code
We will have two different CDK Stacks for AWS Cognito and AWS ApiGateway.
AWS Cognito Stack
1
2
3
4
5
6
7
8
9
10
11
12
13
14
15
16
17
18
19
20
21
22
23
24
25
26
27
28
29
30
31
32
33
34
35
36
37
38
39
40
41
42
43
44
45
46
47
48
49
50
51
52
53
54
55
56
57
58
59
60
61
62
63
64
65
66
67
68
import * as cdk from 'aws-cdk-lib';
import * as cognito from 'aws-cdk-lib/aws-cognito';
import { Construct } from 'constructs';

export class CognitoStack extends cdk.Stack {
  readonly cognitoUserPool: cognito.IUserPool;

  constructor(scope: Construct, id: string, props?: cdk.StackProps) {
    super(scope, id, props);

    this.cognitoUserPool = new cognito.UserPool(this, 'awesome-cognito-user-pool', {
      signInAliases: {
        email: true,
      },
      selfSignUpEnabled: true,
      autoVerify: {
        email: true,
      },
      userVerification: {
        emailSubject: 'You need to verify your email',
        emailBody: 'Thanks for signing up Your verification code is {####}',
        emailStyle: cognito.VerificationEmailStyle.CODE,
      },
      accountRecovery: cognito.AccountRecovery.EMAIL_ONLY,
      removalPolicy: cdk.RemovalPolicy.DESTROY,
    });

    const awesomeApiReadScope = new cognito.ResourceServerScope({
      scopeName: 'awesomeapi.read',
      scopeDescription: 'awesomeapi read scope',
    });

    const resourceServer = new cognito.UserPoolResourceServer(this, 'awesome-resource-server', {
      identifier: 'awesomeapi-resource-server',
      userPool: this.cognitoUserPool,
      scopes: [awesomeApiReadScope],
    });

    const userPoolAppClient = new cognito.UserPoolClient(this, 'awesome-app-client', {
      userPool: this.cognitoUserPool,
      accessTokenValidity: cdk.Duration.minutes(60),
      idTokenValidity: cdk.Duration.minutes(60),
      refreshTokenValidity: cdk.Duration.days(1),
      preventUserExistenceErrors: true,
      generateSecret: false,
      enableTokenRevocation: true,
      authFlows: {
        userPassword: true,
      },
      oAuth: {
        flows: {
          authorizationCodeGrant: true,
        },
        scopes: [
          cognito.OAuthScope.OPENID,
          cognito.OAuthScope.resourceServer(resourceServer, awesomeApiReadScope),
        ],
        callbackUrls: ['http://localhost:3000/dashboard'],
      },
    });

    this.cognitoUserPool.addDomain('awesome-cognito-domain', {
      cognitoDomain: {
        domainPrefix: 'buraktas-awesome-domain',
      },
    });
  }
}
I will skip the cognito.UserPool construct which is the same and a short version of the previous tutorial.
cognito.ResourceServer
identifier: This is just an identifier for the resource server. (It is not the id of the CDK construct)cognitoUserPool: Related Cognito UserPool to attach this Resource Serverscopes: The list of available scopes we want to grant access for App Clients. Remember that we were authorized to call our protected API with the given scope ofawesomeapi-resource-server/awesomeapi.read. So, it has a format like {resource_server_identifier/scope_name}
cognito.UserPoolClient
cognitoUserPool: The associated UserPool this AppClient will use.accessTokenValidity: Validity of the access token.idTokenValidity: Validity of the id token.refreshTokenValidity: Validity of the refresh token.preventUserExistenceErrors: To make Cognito return more abstract errors instead of indicating that user doesn’t really exist, invalid password etc.generateSecret: Whether to generate a client secret for the App Client. In our case, we don’t need this secret since we are using this App Client on Web App and we don’t want to expose it to public.authFlows: Types of the auth flows AppClient will support. In this example we are just using simple username password flow.oAuth: OAuth settings including flow type, scopes and callback urls. For this tutorial, we are usingauthorizationCodeGrantOAuth flow.
NOTE: There is also another scope OPENID which is not related to this example, however, due to a bug from AWS Amplify we have to include this scope as well. Otherwise, AWS Amplify will return an error
when using Auth.currentAuthenticatedUser() after the user is redirected back to the provided redirect_uri. In our case, it is the Dashboard page (which is also a protected UI page). Here is the related Github Issue
As the last step, we also create a Cognito Domain with a custom name. And attach it to Cognito UserPool
AWS APIGateway Stack
In this stack we are just creating a RestApi with one protected GET endpoint. We will not deep dive into this stack. It is basically a Mocked Integration to support
basic request response model. We will get a custom API URL after the deployment. The only important part here is configuring a CognitoUserPoolsAuthorizer and defining which authorization scopes are required for the GET method.
1
2
3
4
5
6
7
8
9
10
11
12
13
14
15
16
17
18
19
20
21
22
23
24
25
26
27
28
29
30
31
32
33
34
35
36
37
38
39
40
41
42
43
44
45
46
47
48
49
50
51
52
53
54
55
56
57
58
59
60
61
import * as cdk from 'aws-cdk-lib';
import * as apigw from 'aws-cdk-lib/aws-apigateway';
import * as cognito from 'aws-cdk-lib/aws-cognito';
import { Construct } from 'constructs';

export class ApiGatewayStack extends cdk.Stack {
  constructor(scope: Construct, id: string, cognitoUserPool: cognito.IUserPool, props?: cdk.StackProps) {
    super(scope, id, props);

    const awesomeApi = new apigw.RestApi(this, 'awesome-api', {
      endpointTypes: [apigw.EndpointType.REGIONAL],
      deploy: true,
      deployOptions: {
        stageName: 'prod',
      },
      defaultCorsPreflightOptions: {
        allowOrigins: apigw.Cors.ALL_ORIGINS,
        allowMethods: apigw.Cors.ALL_METHODS,
      },
    });

    const cognitoUserPoolAuthorizer = new apigw.CognitoUserPoolsAuthorizer(this, 'cognito-userpool-authorizer', {
      cognitoUserPools: [cognitoUserPool],
    });

    // /awesomeapi
    const awesomeApiResource = awesomeApi.root.addResource('awesomeapi');
    awesomeApiResource.addMethod(
      'GET',
      new apigw.MockIntegration({
        integrationResponses: [{
          statusCode: '200',
          responseTemplates: {
            'application/json': JSON.stringify({
              statusCode: 200,
              message: 'Hello From Protected Resource',
            }),
          },
          responseParameters: {
            'method.response.header.Content-Type': "'application/json'",
            'method.response.header.Access-Control-Allow-Origin': "'*'",
          },
        }],
        requestTemplates: {
          'application/json': "{ 'statusCode': 200 }",
        },
      }), {
        methodResponses: [{
          statusCode: '200',
          responseParameters: {
            'method.response.header.Content-Type': true,
            'method.response.header.Access-Control-Allow-Origin': true,
          },
        }],
        authorizer: cognitoUserPoolAuthorizer,
        authorizationType: apigw.AuthorizationType.COGNITO,
        authorizationScopes: ['awesomeapi-resource-server/awesomeapi.read'],
      },
    );
  }
}
Synth Stack(s)
1
2
3
> cdk synth

Supply a stack id (AuthCodeFlowStack, AuthCodeFlowStack/CognitoStack, AuthCodeFlowStack/ApiGatewayStack) to display its template.
Deploy Stack(s)
1
> cdk deploy --all
Destroy Stack(s)
Don’t forget to delete the stack after your testing.
1
> cdk destroy --all
I hope you enjoyed my tutorial about OAuth Authorization Code Flow in AWS CDK. Here you can also find the related github repository. Please don’t hesitate any questions if you have.
Comments powered by Disqus.