
In my previous articles, we saw how to implement OAuth flows for implementing protected APIs. In this tutorial, we will implement a protected API served through an API Gateway configured with IAM Authorization that doesn’t require a JWT token and supports access from different AWS accounts. I had a use case to implement an internal API for a couple of teams within the same AWS Organization. IAM Authorization provides a simpler way of securing your APIs so that you don’t need to provision Cognito AppClients for using any of the OAuth flows. You only need to configure IAM policies from both accounts. This tutorial will use;
- An account having an API Gateway backed by an AWS Lambda
- An account having an AWS Lambda
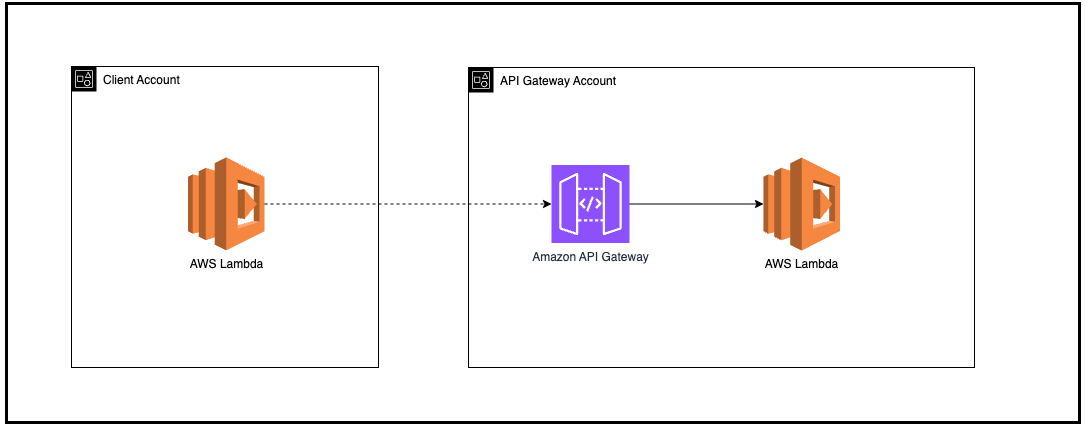
Since, we are dealing with cross accounts we will be deploying two different stacks into two different accounts separately.
API Gateway Account
This is the source account which will have the protected API served through Amazon API Gateway backed by an AWS Lambda. Every programmatic client needs to sign the request before sending the actual request to the API which
you can find the details in their reference documentation. The resource policy of the API Gateway needs to have
execute-api:Invoke action allowed for client accounts defined as AWS principal. In our tutorial this is the policy statement we will be using;
1
2
3
4
5
6
7
8
9
10
11
12
13
{
  "Version": "2012-10-17",
  "Statement": [
    {
      "Effect": "Allow",
      "Principal": {
        "AWS": "arn:aws:iam::329380440465:root"
      },
      "Action": "execute-api:Invoke",
      "Resource": "arn:aws:execute-api:us-east-1:548754742764:*"
    }
  ]
}
As you can guess Principal is the client account who wants to access to our API Gateway. However, this policy makes the API accessible from everything within the client account.
A more secured version would be using Condition based on a given role name (or even a role name prefix if you are deploying into multiple stages like; beta, gamma and prod) to limit access
only for specific resources which assumes that role. Here is what the Condition attribute of the IAM policy would look like;
1
2
3
4
5
"Condition": {
  "StringLike": {
    "aws:PrincipalArn": "arn:aws:iam::329380440465:role/ecs-app-dev*"
  }
}
When creating the API Gateway you have to set the IAM policy either inline within RestApi construct or assign it from a predefined PolicyStatement object. Unfortunately, it is not possible to update
its resource policy after initializing it which forces us to use * on Resource level. Thus, it grants access to other APIs deployed in the same account.
1
2
3
4
5
6
7
8
9
10
11
12
13
14
15
16
17
18
19
20
21
22
23
24
25
26
27
28
29
30
31
32
33
34
35
// Grant access for client account to call Api Gateway in this account
const apiGwPolicy = new iam.PolicyStatement({
  effect: iam.Effect.ALLOW,
  principals: [
    new iam.AccountPrincipal(props?.crossAccId),
  ],
  actions: [
    'execute-api:Invoke',
  ],
  resources: [
    this.formatArn({
      service: 'execute-api',
      resource: '*', // CDK doesn't support updating policy of REST API after initializing it - https://github.com/aws/aws-cdk/issues/8781
    }),
  ],
});

const orderRestApi = new apigw.RestApi(this, 'rest-api-order', {
  deployOptions: {
    stageName: 'prod',
  },
  deploy: true,
  defaultMethodOptions: {
    authorizationType: apigw.AuthorizationType.IAM, // Set Auth type to IAM
  },
  defaultCorsPreflightOptions: {
    allowMethods: ['GET', 'OPTIONS'],
    allowOrigins: apigw.Cors.ALL_ORIGINS,
  },
  policy: new iam.PolicyDocument({
    statements: [
      apiGwPolicy,
    ],
  }),
});
Client Account
This is the account with having a bare Lambda function which signs the request and makes a call to the API Gateway in the source account. Any unsigned request will result with a 403 Forbidden response.
A simple curl command is enough to illustrate the http call.
1
2
3
> curl https://no8k0bxy8b.execute-api.us-east-1.amazonaws.com/prod/

{"message":"Missing Authentication Token"}
Remember that we need to also update the IAM policy of the Lambda?
1
2
3
4
5
6
7
8
9
10
11
12
13
14
// Update Lambda role policy to allow it calling related Rest API from source account
clientLambda.addToRolePolicy(new iam.PolicyStatement({
  actions: [
    'execute-api:Invoke',
  ],
  resources: [
    this.formatArn({
      account: props.apiGwAccId,
      service: 'execute-api',
      resource: props.apiGwApiId,
      resourceName: '*',
    }),
  ],
}));
This will generate an IAM policy with Resource having the Api ID. You can configure the Resource attribute by adding Http Method, stage and resource path if you want to have a more limited version
of access control. (reference)
1
2
3
4
5
6
7
8
9
10
{
    "Version": "2012-10-17",
    "Statement": [
        {
            "Action": "execute-api:Invoke",
            "Resource": "arn:aws:execute-api:us-east-1:548754742764:no8k0bxy8b/*",
            "Effect": "Allow"
        }
    ]
}
Testing
We can invoke the deployed Lambda directly by its related cli command. On the other hand, you can find the related code example here about signing the http request.
1
2
3
4
5
6
7
> aws lambda invoke --function-name ClientStack-clientlambda6AA9C2E1-0V26lwpOjG5o  --profile <profile_name> response.json

// The output of Lambda written in response.json
{
    "statusCode": 200,
    "body": "{\"id\":123,\"category\":\"book\"}"
}
Synth Stack(s)
1
2
3
4
> cdk ls

ApiStack
ClientStack
Deploy Stack(s)
This example requires a two-phase deployment. We need to first deploye ApiStack and get the ID of the RestApi and pass it into ClientStack
1
2
3
4
5
6
7
8
> cdk deploy --all --profile <source_account_profile>

// It will output the ID and Endpoint of the RestApi
Outputs:
ApiStack.apigatewayrestapiid = no8k0bxy8b
ApiStack.restapiorderEndpoint61F5A1AF = https://no8k0bxy8b.execute-api.us-east-1.amazonaws.com/prod/

> cdk deploy --all --profile <client_account_profile>
Destroy Stack(s)
Don’t forget to delete the stack after your testing.
1
2
3
> cdk destroy --all --profile <source_account_profile>

> cdk destroy --all --profile <client_account_profile>
You can also find my related github repository here.
Comments powered by Disqus.