
In this tutorial I will walk through about building a disposable email address architecture on AWS for received emails. We will be able intercept emails and process their attributes like subject, body, attachments etc. Nowadays, there are so many online products requires a valid email to send a verification code to complete registration. In these cases you may not want to give your personal or work email which you can have a disposable email address for these kind of temporary operations.
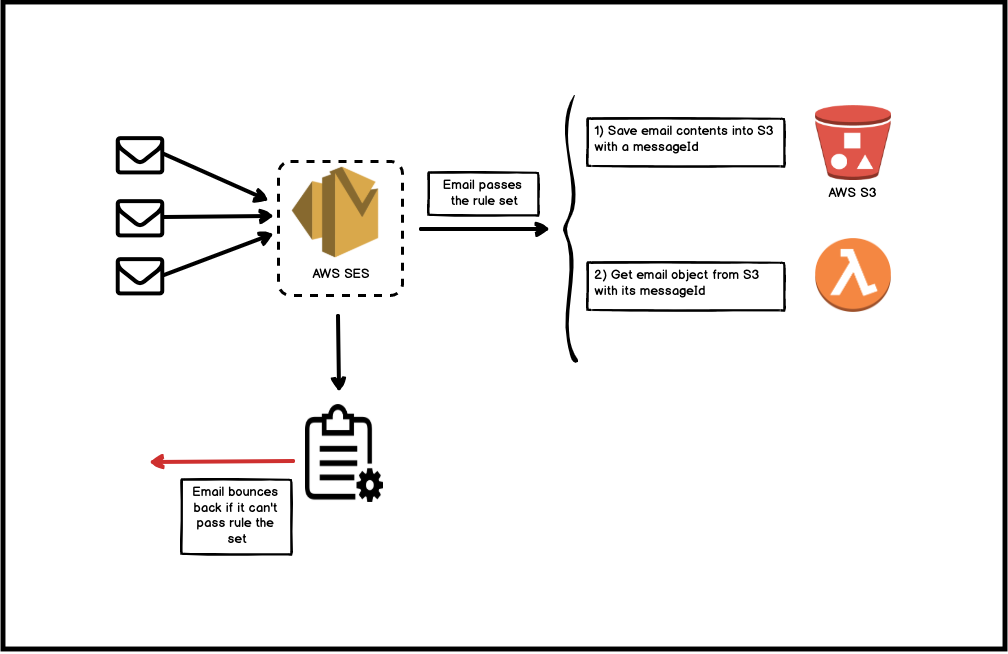
- Intercept incoming emails and filter through defined rule set in
AWS SES. - Save email with its contents into
S3. - Invoke an
AWS Lambdafunction to process received email by getting email contents fromS3with itsmessageId.
One thing to note here is we have to persist email contents into either S3 or send it to SNS and get the contents from there because AWS SES doesn’t store this data. There is an related stackoverflow post
1. Verifying Domain
As the first step we will verify our domain on AWS SES. I assume we bought this domain on Route 53 on Amazon. On the other hand, we can also verify our domains registered from different registrars by adding MX record into domain’s DNS records. For example say we have sometestingdomain.com.
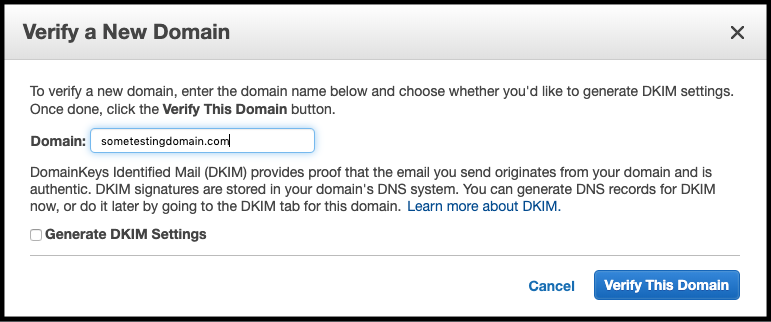
Here Genarate DKIM Settings is totally optional since you can set it up later. More information can be found on wikipedia and if you like to set DKIM for your domain on AWS you can also follow this thread. After you click on Verify Domain you will see another popup page which includes the different DNS records you need to add to send/receive emails for your domain.
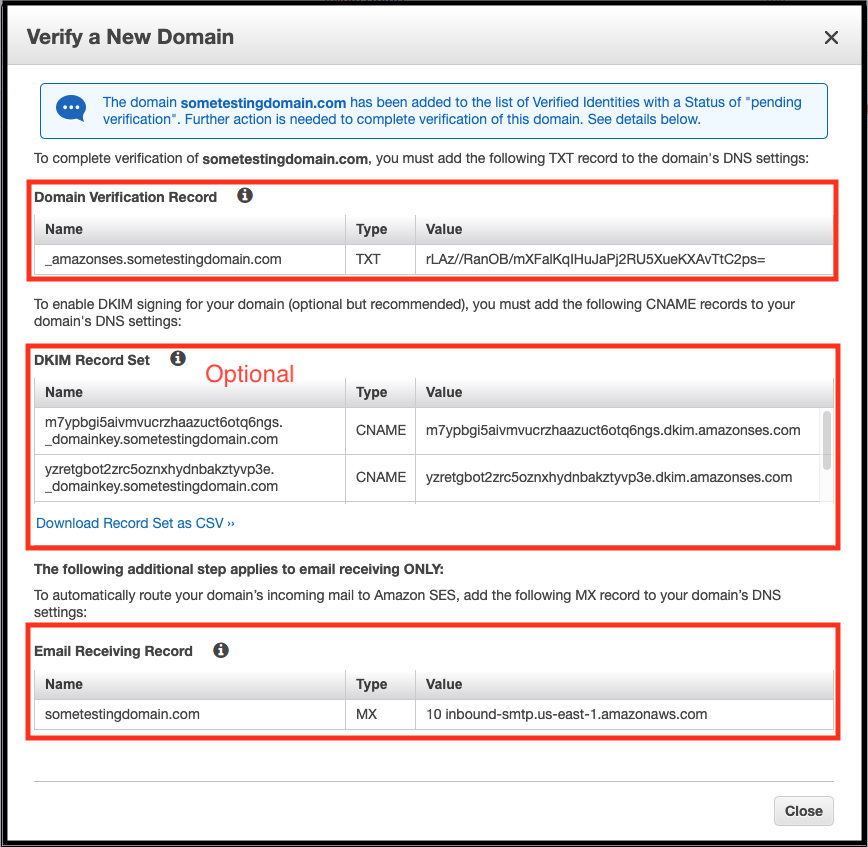
If your domain belongs to AWS then the records will be added automatically. Otherwise, you have to login into your registrar’s platform to add these DNS records by yourself. The Domain Verification Record is basically for verifying that this domain belongs to you. AWS will probe the DNS records and will verify it later. Moreover, MX record is for making your domain to receive emails. It stands for Mail Exchange and it includes two propertiesl; the priority level of your SMTP server and SMTP server url. One thing to note there is setting your priority level. This becomes handy if you want to configure multiple SMTP servers for your domain. So, when you receive an email your DNS will check the priority list of MX records and forward the incoming email to the SMTP server with the lowest priority. You can check this wiki for more information.
After a few hours (or even less) our domain will get verified.

2. Create a S3 Bucket
We will create a S3 bucket to keep all of the incoming emails with their contents. AWS SES assigns a messageId (basically a UUID) for each of the received email. With this way, our Lambda function will get the related email with its messageId from S3. Lets create a bucket named disposable-mails-bucket. After creating the bucket we need to define a bucket policy to grant access to AWS SES so it can write emails into this bucket. Here is the simple JSON Bucket Policy.
1
2
3
4
5
6
7
8
9
10
11
12
13
14
15
16
17
18
19
{
    "Version": "2012-10-17",
    "Statement": [
        {
            "Sid": "AllowSESPuts",
            "Effect": "Allow",
            "Principal": {
                "Service": "ses.amazonaws.com"
            },
            "Action": "s3:PutObject",
            "Resource": "arn:aws:s3:::disposable-mails-bucket/*",
            "Condition": {
                "StringEquals": {
                    "aws:Referer": "###########"
                }
            }
        }
    ]
}
aws:Referer is your account number which you find from My Account –> Account Settings –> Account Id.
3. Create AWS Lambda Function
Last step before creating our rule set is creating Lambda function to get emails by their messageId from S3. After getting the email from S3 we will parse it to get subject and its body. I will use nodejs lanbguage for the function and use mailparser library to parse the email. Lets create a function with name email-processor and create a nodejs workspace including a file with index.js. You can find can the example project structure from my github. Basically, this is the code piece we will use in our Lambda function.
1
2
3
4
5
6
7
8
9
10
11
12
13
14
15
16
17
18
19
20
21
22
23
24
var AWS = require("aws-sdk");
var simpleParser = require("mailparser").simpleParser;

var s3 = new AWS.S3();

exports.handler = async (event, context, callback) => {
    console.log("Invoked Lambda");
    const mail = event.Records[0].ses.mail;

    console.log("Mail");
    console.log(JSON.stringify(mail));

    var getParams = {
        Bucket: "disposable-mails-bucket",
        Key: mail.messageId,
    };
    let emailFromS3 = await s3.getObject(getParams).promise();
    let parsedEmail = await simpleParser(emailFromS3.Body);

    console.log("parsedEmail Subject: "  + parsedEmail.subject);
    console.log("parsedEmail Body: " + parsedEmail.textAsHtml);

    callback(null);
};
NOTE: We also need to give Lambda function to access S3. It can be done from IAM console and Roles section. Find the current role of your Lambda function and attach either AmazonS3ReadOnlyAccess or AmazonS3FullAccess.
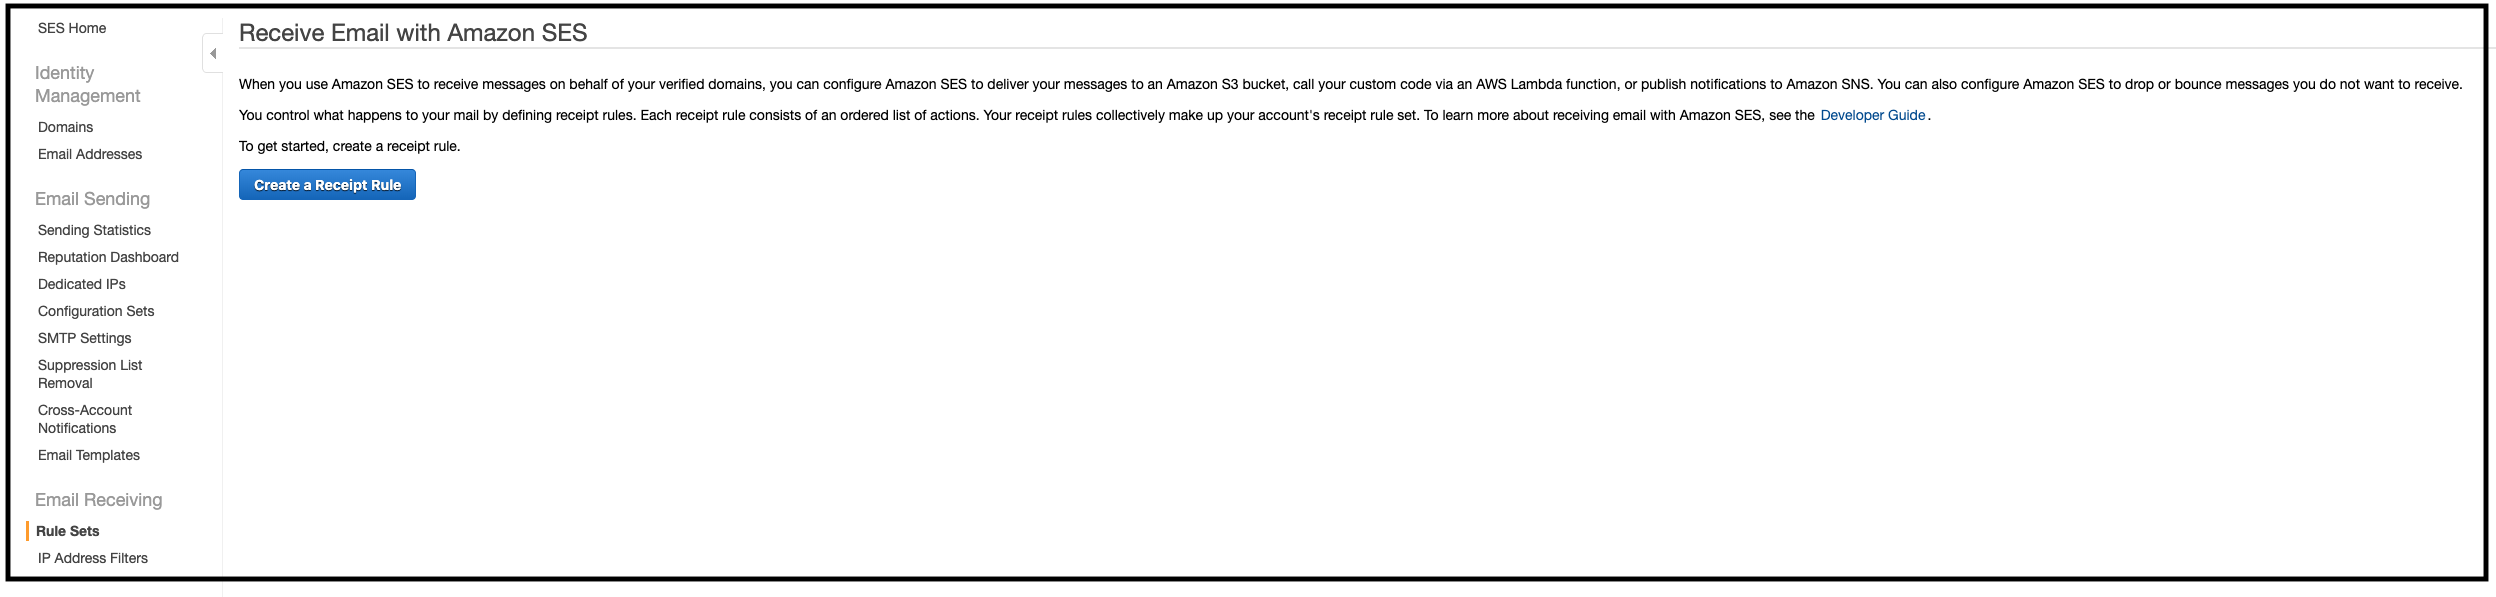
4. Create Email Receiving Rule Set
After we created S3 bucket and Lambda function the final step is creating an email receving rule set to define the main steps when we receive an email. We will just define two steps here which are;
- Persisting email with its contents into
S3by a messageId - Extracting email with its contents from
Lambdaby its messageId for further processing.
First step will be selecting Rule Sets under Email Receiving section from left-side menu on AWS SES main console. We will now create a receipt rule.
In the next section we will be asked to add any recipient email addresses to intercept incoming emails. If there are no any recipient added then it will be considered to intercept any recipient email address from our domain.

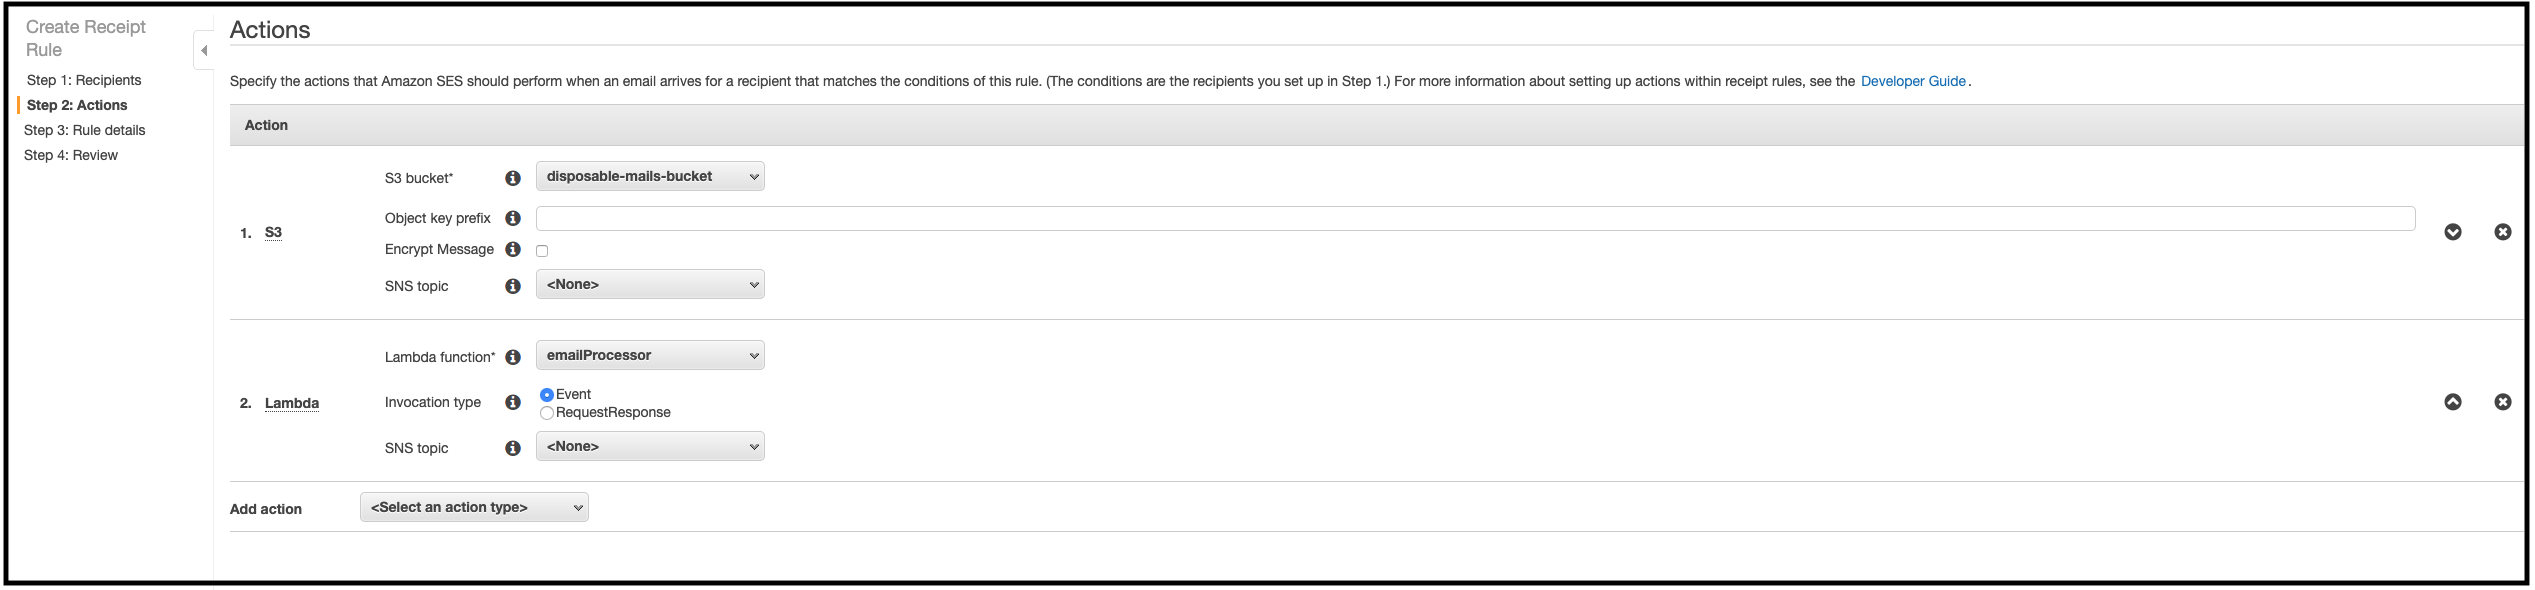
Now it is time to define actions. As the first action we will select S3 with the bucket we created from the dropdown and select Lambda as the following action with the name of the function we just created.
Next, we will configure some rule details. We can just leave it with its default options by defining Rule name.

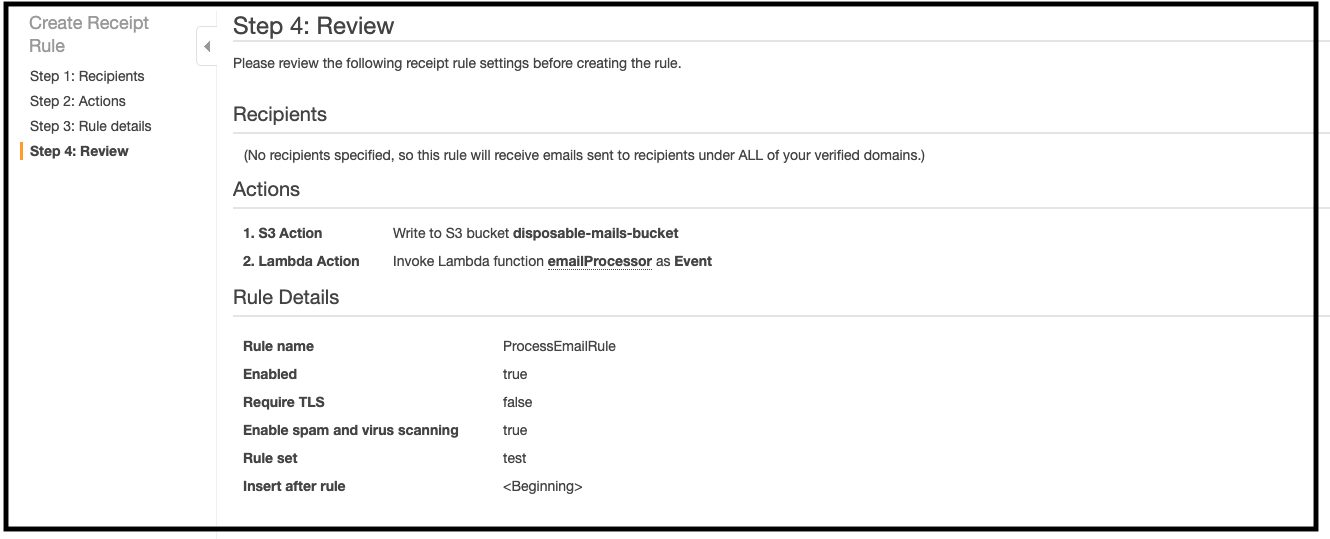
Finally, we will see a review page like below;
Now we will be able to intercept any email incoming to any subdomain of our verified domain. You can test it by sending an email from your favorite email provider and verify that email has been processed by checking cloudwatch logs (if you enabled) or checking if there is any email content saved in S3. I sharing an example output from my lambda function.
1
2
3
4
5
6
7
8
9
10
11
12
13
14
15
16
17
18
START RequestId: c7c3c8f9-a868-4e7c-90e4-b2ffb88e90fe Version: $LATEST
2019-08-27T10:53:19.513Z	c7c3c8f9-a868-4e7c-90e4-b2ffb88e90fe	Mail
2019-08-27T10:53:20.891Z	c7c3c8f9-a868-4e7c-90e4-b2ffb88e90fe	parsedEmail Subject: This is my test email
2019-08-27T10:53:20.891Z	c7c3c8f9-a868-4e7c-90e4-b2ffb88e90fe	parsedEmail Body: <p>This is test email body</p><p>--<br/>Burak</p>
2019-08-27T10:53:20.891Z	c7c3c8f9-a868-4e7c-90e4-b2ffb88e90fe	parsedEmail To:
{
    "value": [
        {
            "address": "foobar@somerandomdomain.net",
            "name": ""
        }
    ],
    "html": "<span class=\"mp_address_group\"><a href=\"mailto:foobar@somerandomdomain.net\" class=\"mp_address_email\">foobar@somerandomdomain.net</a></span>",
    "text": "foobar@somerandomdomain.net"
}

END RequestId: c7c3c8f9-a868-4e7c-90e4-b2ffb88e90fe
REPORT RequestId: c7c3c8f9-a868-4e7c-90e4-b2ffb88e90fe	Duration: 1616.06 ms	Billed Duration: 1700 ms Memory Size: 128 MB	Max Memory Used: 87 MB
Comments powered by Disqus.